Apricot Jam

14 08 2008


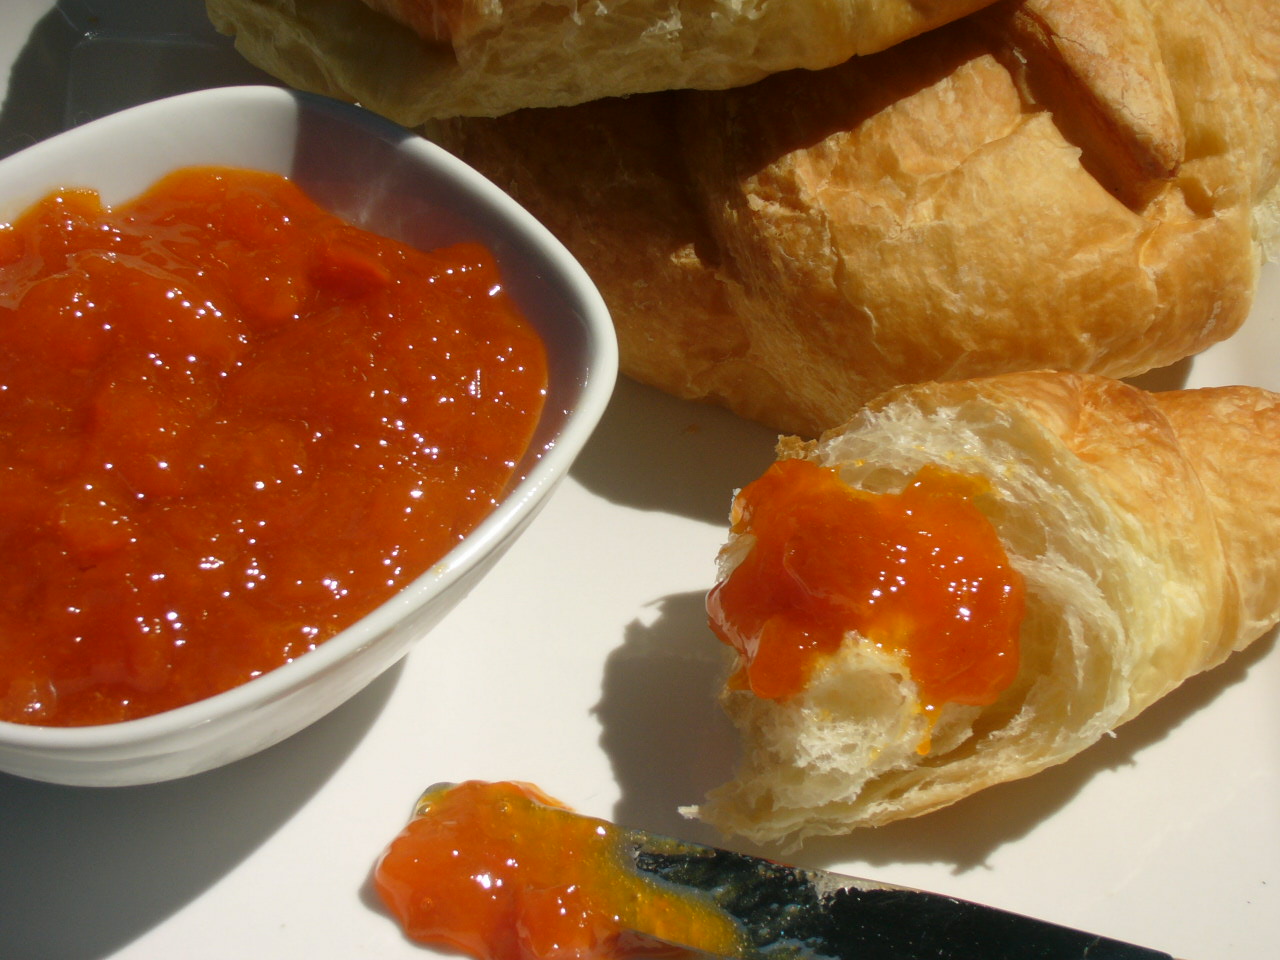
This is a very quick version of an apricot spread that you can use on biscuits, toast or croissants to make your morning a little brighter.  I don’t even add any pectin – the fruit mixture just simmers down until it gets quite thick.  This makes only a small batch of jam and is intended to be eaten right away rather than canned.  For information on how to make large batches and prepare jars for canning, visit http://www.pickyourown.org/allaboutcanning.htm

Apricot Jam

Makes approximately 1 cup of jam    

(VEGETARIAN)

  • 2 heaping cups of apricots (about 15 small apricots), quartered and pits removed
  • Pits from the apricots
  • 1 cup sugar
  • 1 Tablespoon amaretto liqueur
  • 2 teaspoons lemon juice
  • 1/4 cup water
  1. In a large saucepan over medium-high heat, place all ingredients (including pits). 
  2. Bring fruit mixture to a simmer and reduce heat so it is gently simmering (not a hard boil).  Simmer for approximately 45 minutes or until fruit has cooked down and started to thicken.
  3. Remove pits and discard.  Let jam cool and use on toast, etc.  Can be kept covered in the refrigerator for a few days.

Bon Appetit and Enjoy!


News and Inspiration – August 10th, 2008…

10 08 2008

It’s now peak season for produce at the market.  Here are a few things to look out for when you’re shopping (based on availability in Southern Ontario, which will vary slightly in other regions):

  • Corn.  I bought some corn on the cob about a week and a half ago and it wasn’t great but the cobs I picked up yesterday were sweet and delicious.  Serving idea:  Cut kernels off the cob and stir into your favourite salsa for a sweet, raw crunch that’s delicious with corn chips. 

  • Tomatoes.  To be honest, so far I’ve found local tomatoes to be a bit disappointing.  Some of the smaller ones such as strawberry and cherry tomatoes have been quite flavourful but the field tomatoes I recently bought were a bit mealy and lacking in flavour.  Hopefully better ones will hit the market soon.  Serving idea: Toss some halved cherry tomatoes with cooked pasta, olive oil, torn basil leaf, salt and pepper and cubed fresh mozzarella.  Serve warm or at room temperature.

  • Peaches.  They are just starting to come into their own.  It’s been a wet season in Ontario peach country so they may be a bit slower than normal reaching their peak but after I let them sit for a day or two (on the counter – not in the fridge), they were quite juicy and sweet.  Serving idea: Halve peaches and discard pits.  Brush with a bit of honey and place cut side down on a hot grill.  Grill until lightly browned with grill marks.  Serve with vanilla ice cream or lightly sweetened whipped cream.


  • Peppers.  Red, green and yellow peppers are just starting to turn up at farmer’s markets.  Often they are a bit misshapen and ugly compared to the perfect greenhouse specimens we usually see but they are not lacking in flavour.  The red and yellow peppers I picked up yesterday were very sweet.  Serving idea:  Saute strips of green, red and yellow peppers in a pan with sliced onions and a bit of oil and garlic.  Squeeze with fresh lime juice and season with salt and pepper.  Serve with grilled chicken or beef (omit for vegetarians), sliced avocado, salsa and sour cream in a warm flour tortilla.

  • Eggplant and zucchini.  Zucchini are abundant right now so I will be developing a few recipes to use them up (particularly for those of you in rural areas where zucchini can quickly get out of control and people will leave baskets of them on their neighbour’s doorsteps just to get rid of them!).  Servng idea: Cut zucchini, eggplant, mushrooms, peppers and onions into large chunks and toss with a tablespoon each of olive oil and balsamic vinegar.  Place in grilling pan (or a roasting pan for the oven) and grill or roast until vegetables begin to soften and brown around the edges.  Season with sea salt and your favourite fresh herbs before serving (thyme, oregano or basil are delicious). 

  • For Ontario home chefs (particularly those of you in the Greater Toronto Area): I recently discovered a fantastic gourmet store that features products primarily from Ontario, including oils, vinegars, meats, cheeses, produce, nuts and flour.   It’s called Culinarium and it is an excellent source for anyone in Ontario who is hoping to use local ingredients.  They carry Red Fife flour, which has become a favourite of chefs (JK Wine Bar in Toronto uses it).   I’m working on a couple of recipes using the flour so stay tuned.  The service at Culinarium is excellent: very friendly and they will let you sample virtually everything they keep in stock.  I picked up some flours, vinegar, oil, peanuts, dried cranberry and a bit of produce.   Their website is www.culinarium.ca and they are located at 705 Mt. Pleasant Road, Toronto, Ontario, phone: 647-430-7004.   

I’ve been exploring the farmer’s markets and doing a lot of experimentation in the kitchen so check back often for the latest in market news, gourmet finds and of course, new recipes with seasonal ingredients.  Have a great weekend and good eating!

Ciao,

Trish


Corn and Tomato Salad with Basil Vinaigrette

7 08 2008


Corn is one of my favourite vegetables.  The season for fresh corn is very brief in Canada so during the few weeks it’s available, I eat it as often as I can.  Simply roasted or boiled corn on the cob with butter, salt and pepper is a classic but it’s also wonderfully versatile as an ingredient in salads, pasta sauces or soups.  I developed this recipe as a way to showcase a few summer ingredients that we can only get for a short time so enjoy it while you can!   It’s also an excellent way to use up any leftover cooked corn (if there ever is such a thing – which is not too often in my house!)

Corn and Tomato Salad with Basil Vinaigrette

Makes approximately 4 servings as a side dish

(Can be adapted to be VEGETARIAN)

Salad:

  • 2-1/2 cups cooked corn, cut off the cobs (approximately 4 cobs)
  • 4 rashers bacon (optional – omit for vegetarians)
  • 10 to 12 mini tomatoes (such as cocktail, cherry, grape, etc.), cut in half
  • 3 Tablespoons red onion, cut into a fine dice
  • 1/4 cup red pepper, cut into a fine dice
  • Salt and pepper, to taste
  • Fresh basil leaf, for garnish
  1. Cook bacon until crisp.  Crumble into pieces and place in a large bowl.
  2. Add tomatoes, corn, onion and red pepper to bowl.  Drizzle with basil vinaigrette (see recipe below) and toss to coat.
  3. Season with salt and pepper and garnish with a basil leaf.

Basil Vinaigrette:

  • 4 Tablespoons neutral oil (such as canola or safflower)
  • 2 teaspoons white wine vinegar
  • 1 teaspoon red wine vinegar
  • 1 Tablespoon finely chopped fresh basil (*see tip on how to chop basil)
  • 1/2 teaspoon dijon mustard
  • pinch of salt

*Tip for cutting basil leaf: Take a few large basil leaves and roll them up together very tightly, as though rolling a cigar.  With a sharp knife, cut through roll in thin strips.   Chop up strips into smaller pieces.

  1. Combine all vinaigrette ingredients in a small bowl and whisk together.  Use on corn salad or other summer salads.

Bon Appetit and Enjoy!

corn-tomato-salad


Peach Chutney

6 08 2008

I debated about what to call this – peach salsa, peach sauce, peach relish…  It is probably closest in style to a classic chutney – fruit, vinegar and spices are cooked together to make a delicious accompaniment to grilled meats.   I have given a few suggestions below for using the chutney. 

Peach Chutney

Makes approximately 1-2/3 cups sauce

(VEGETARIAN)

  • 4 large, ripe peaches
  • 3 Tablespoons very finely diced red onion
  • 2 Tablespoons very finely diced red pepper
  • 1/2 a jalapeno pepper, seeds and membranes removed and finely diced
  • 1 Tablespoon neutral oil, such as safflower or canola
  • 2 Tablespoons packed brown sugar
  • 1/4 cup apple cider vinegar
  • 1 teaspoon finely chopped fresh thyme
  • 1/2 teaspoon ground mustard powder
  • 1/2 teaspoon Worchestershire sauce
  • 1/4 teaspoon chili powder
  • 1 clove garlic, finely minced
  • 1 teaspoon red pepper flakes
  • salt & pepper, to taste
  1. Remove skin from peaches (see note*) and dice fruit, discarding the pits.  Set aside.  *To remove peach skin:  Fill a large bowl with ice and cold water and set aside.  Fill a stockpot with water and bring to a boil.  While the water is coming to a boil, use a knife to cut a large ‘X’ into the bottom of the peaches, making sure to cut right through the skin.  Once the water has come to a boil, carefully place the peaches into the water.  Leave them in for 45 seconds and then remove with a slotted spoon.  Drop peaches immediately into the bowl of ice water to stop them from cooking.  The skin should lift away fairly easily once they have cooled.  Peel skin off  and discard  (it’s not a big deal if you can’t get it all off easily – it will add a bit of colour and texture).
  2. In a medium saucepan, heat oil and saute onions, red pepper and jalapeno pepper on medium-high heat until they begin to soften, approximately 2 minutes. 
  3. Add peaches and cook for another 2 minutes.  Add remaining ingredients and cook on medium heat for approximately 10 minutes, until fruit is beginning to soften and the flavours start to come together.
  4. Chutney can be made in advance and refrigerated.

Serving Suggestions for Peach Chutney:

  • It makes an excellent accompaniment to grilled pork and chicken dishes.  For blue cheese stuffed pork chops: Take a thick cut (2″) pork chop and make a slit in the side with a sharp knife, forming a pocket.  Stuff with about a teaspoon crumbled blue cheese per chop.  Rub both sides of the pork chops with olive oil, salt, pepper, finely chopped thyme and rosemary.  Saute or grill seasoned chops. 
  • It makes a great dipping sauce for shrimp.
  • Puree chutney and use as a grilling glaze for shrimp, pork or chicken.  Use as you would a barbeque sauce.
  • Make simple hors d’oeuvres: put a dollop of cream cheese on a cracker and top with a spoonful of chutney.  Garnish with a sprig of thyme.
  • Use as a spread for chicken sandwiches or wraps in place of mayonnaise.
  • Add a teaspoon of ground cumin and serve with your favourite Indian dishes.

Bon Appetit and Enjoy!


Raspberry Yogurt Muffins

4 08 2008

Growing up in rural New Brunswick, we had a raspberry patch behind our house.  I didn’t exactly enjoy picking them – if you didn’t want to get scratched to pieces you had to wear long sleeves and pants in the summer heat.   However, they were so sweet and delicious, it was worth the trouble (my mom makes an excellent raspberry pie).  Luckily, farmer’s markets and some supermarkets are now carrying locally picked raspberries, sparing my limbs the trauma of picking my own.

The secret to making big, bakery-style muffins is to fill the muffin tins up to the top of the cups.  Be sure to grease the top of the tin as well as inside the cups because the muffin tops will puff up and cover the tin.  Another helpful tip: if you freeze the raspberries spread out on a baking sheet lined with wax paper, the frozen berries will not bleed into the batter as much as fresh ones.

Raspberry Yogurt Muffins

Makes 6 large muffins or 12 small muffins

(VEGETARIAN)

  • 1-1/2 cups + 1 Tablespoon unbleached flour 
  • 1-1/2 teaspoons baking powder
  • 1/2 teaspoon baking soda
  • 1/2 teaspoon salt
  • 3/4 cup + 1 Tablespoon sugar
  • 2 large eggs
  • 2/3 cup neutral oil, such as safflower or canola
  • 1/3 cup plain yogurt
  • 1 cup raspberries
  • Sugar to sprinkle on top of muffins
  1. Preheat oven to 375 degrees Fahrenheit.
  2. In a large mixing bowl, combine 1-1/2 cups flour, 3/4 cup sugar, the baking powder, baking soda and salt.  Stir to combine.
  3. Add wet ingredients: the eggs, oil and yogurt.  Stir until batter is mixed together (it will be quite thick).
  4. In a separate bowl, combine raspberries with 1 Tablespoon flour and 1 Tablespoon sugar.  Toss to coat berries.
  5. Very carefully fold raspberries into muffin batter until they are mixed in.  Spoon batter into muffin cups (fill halfway for 12 small muffins or fill to the top of the cups to make 6 large muffins).
  6. Sprinkle muffin tops with a little bit of sugar.  For large muffins, bake for approximately 30 to 35 minutes, or until a knife inserted into the muffins comes out clean (reduce baking time for small muffins).
  7. Let the muffins cool in the muffin tin before removing – they are almost impossible to get out in one piece while they’re still hot!

Bon Appetit and Enjoy!

Raspberry Yogurt Muffins (shown with Banana Nut Muffins)

Raspberry Yogurt Muffins (shown with Banana Nut Muffins)


White Bean Dip with Fresh Herbs

30 07 2008

Any serious cook should try to keep an herb garden.  Even if you live in a small apartment, you can keep a small one in a pot on the counter.   The types of herbs will depend on what kind of cooking you’re interested in – if you like Thai food, for example, you’d want to grow fresh cilantro, whereas a cook who prefers Italian might grow a lot of basil.  The fresh herbs I typically have on hand include: sage, Italian parsley, thyme, rosemary, basil and oregano.  I love being able to snip off a bit of herb as I need it.  It’s the ultimate fresh, local ingredient.

Here is a recipe I developed that is quick to put together.  The dip’s flavour will get stronger over time so if you make it in advance, taste it and adjust seasonings before serving.

White Bean Dip with Fresh Herbs

Makes approximately 1-1/4 cups of dip

(VEGETARIAN)

  • One 14 oz. can (398 ml) cannelini beans (aka white kidney beans) OR 1-1/4 cups cooked cannelini beans
  • 2 Tablespoons fresh squeezed lemon juice 
  • 2 Tablespoons olive oil
  • 1/2 teaspoon very finely chopped fresh rosemary
  • 1/2 teaspoon very finely chopped fresh thyme
  • 1 teaspoon very finely chopped fresh sage leaf (approximately 2 medium leaves)
  • 1 garlic clove, finely minced
  • Salt, to taste
  • Pita or flatbreads for serving
  1. Place rinsed and drained beans in a large mixing bowl.  Add olive oil and lemon juice.
  2. Using a potato masher, mash beans until they are completely mashed and relatively smooth.  Do not use a food processor as it results in a dip that is grainy and lacks creaminess.
  3. Mix in chopped herbs, garlic and add salt to taste.  Dip can be made in advance and refrigerated until ready to use.  Serve with flatbread or grilled pita wedges.

Bon Appetit and Enjoy!


Mid-Summer Inspiration

30 07 2008

It’s mid-summer and the farmer’s markets are full of great fresh produce.  Luckily, when fruits and vegetables are at their peak, you don’t have to do a lot with them to make them taste good.  Here are some simple ideas for fuss-free summer cooking. 

Why don’t you:

-Shuck some corn and brush with olive oil.  Sprinkle some salt and pepper on and roast in the oven or grill on the BBQ until golden brown, approximately 15 minutes (turn part way through cooking).  Serve with fresh butter.

-Make a chopped salad with fresh veggies.  Cut up fresh peppers, tomatoes, cucumbers, thin sliced onion, blanched green beans, radishes, etc.  Arrange on a platter with some lettuce.  Drizzle with a basic vinaigrette:

Basic Vinaigrette

  • 1 Tablespoon your favourite vinegar (white wine vinegar, red wine vinegar, balsamic, etc)
  • 3 to 4 Tablespoons neutral oil (such as safflower, canola, etc)
  • 1 garlic clove, finely minced
  • 1/2 teaspoon dijon mustard
  • Salt & pepper, to taste
  1. Put all ingredients in a bowl and whisk until combined.  Use on your favourite salads.


-Cook new potatoes in boiling water until tender.  Toss with pesto sauce and serve with grilled meats.

-Make roasted peppers: Cut a bunch of red, yellow or orange peppers in half lengthwise and remove stem and seeds.  Roast on a grill or in the oven until skin is black and charred.  Place in a large bowl and cover bowl with a plate and let them rest for 15 minutes.  Once peppers have cooled, peel off the charred skins and discard.  Serve peppers as a side dish, in salads or in dips.

-Cut the top 1/4 off of cocktail tomatoes or large cherry tomatoes.  Remove seeds.  Place a basil leaf and cube of buffalo mozzarella in each one.  Sprinkle with sea salt and pepper and drizzle tomaotes with good olive oil.

-Toss cut up peaches with a splash of amaretto liqueur and top with lightly sweetened whipped cream or vanilla ice cream.

Bon Appetit and Enjoy!


Zucchini Blossoms

28 07 2008

One of the goals of The Seasonal Gourmet is to develop recipes that almost anyone can make without searching high and low for exotic ingredients.  However, I feel that I must make a minor exception for zucchini blossoms.  They are not easy to find but if you do happen to come across some they are a wonderful treat.  Your best chance of finding them is at a farmer’s market – they are too fragile to be shipped very far for supermarkets.  The are very popular in Italy where they are often stuffed and then fried in a batter.  I don’t know why they aren’t more popular in North America because there certainly isn’t a shortage of zucchini here.  Perhaps a lot of people don’t realize that the flowers are edible (and delicious!).

Here are two recipes I’ve developed based on zucchini flowers I’ve eaten in Italy.  There are a few steps but it comes together quite easily and the results are definitely worth it.

Zucchini Blossoms with Herbed Ricotta

(VEGETARIAN)

Ricotta Filling:

  • 1/2 cup ricotta cheese
  • 1 teaspoon very finely chopped fresh rosemary
  • 1 teaspoon very finely chopped fresh thyme
  • 1 garlic clove, finely minced
  • 1/4 cup grated Parmesan cheese
  • 1/4 teaspoon salt
  1. In a medium sized bowl, combine all ingredients and stir until blended.  Set aside until ready to use (can be made in advance and refrigerated).

Batter:

  • 1/2  cup unbleached flour
  • 2 teaspoons olive oil or neutral oil (such as canola or safflower)
  • 1/2 to 3/4 cup warm water
  • 3 egg whites
  1. In a large mixing bowl, add flour and olive oil.  Mix together with a spoon.  Add water 1/4 cup at a time, stirring completely into flour mixture.  Add enough to make a smooth batter. 
  2. In a separate bowl, beat egg whites until they form stiff peaks.  Carefully fold beaten egg whites into batter.  Set aside until ready to use.

Putting it all together:

  • 10 to 12 zucchini flowers
  • Neutral oil for frying (such as safflower or canola) – enough to fill a large sauce pan about 2″ deep OR if you have a deep fryer, fill with oil according to manufacturer’s instructions
  • Sea salt
  • Lemon wedges
  1. Clean blossoms thoroughly, by gently peeling back the petals and rinsing inside.  Remove any stamen inside the blossom.  Blot carefully to dry on clean dish cloths or paper towels.  
  2. Carefully separate the petals and fill each flower with a spoonful of ricotta mixture.  Fold petals back up to enclose filling.  Dip blossoms in batter until they are coated.   
  3. Very carefully heat oil in pan (or heat deep fryer) until it is around 350 degrees Farenheit.  You should be able to fry a cube of bread until golden brown in about 15 seconds once it’s at the proper temperature (watch closely and reduce heat if oil begins to smoke).
  4. Drop a few battered blossoms at a time into the oil.   Cook until puffed and golden brown, approximately 2 minutes.  Using a slotted spoon, remove blossoms from heat and drain on a layer of paper towel.   
  5. Repeat the frying process with remaining blossoms.  Sprinkle with sea salt and a squeeze of fresh lemon juice and serve immediately.


Zucchini Blossoms with Shrimp

This recipe was inspired by a dish I had at Ristorante Romano, a seafood restaurant in Viareggio, Italy on the Tuscan coast.  This follows the same technique as the ricotta stuffed blossoms above but is even simpler because the filling doesn’t require any mixing.

  • 10 to 12 zucchini blossoms
  • 10 to 12 large cooked shrimp, shells and tails removed
  • Batter – see recipe above
  • Neutral oil for frying (such as safflower or canola) – enough to fill a large sauce pan about 2″ deep OR if you have a deep fryer, fill with oil according to manufacturer’s instructions
  • Sea salt
  • Lemon wedges
  1. Clean blossoms thoroughly, by gently peeling back the petals and rinsing inside.  Remove any stamen inside the blossom.  Blot carefully to dry on clean dish cloths or paper towels.  
  2. Carefully separate the petals and fill each flower with a shrimp.  Fold petals back up to enclose shrimp.  Dip blossoms in batter until they are coated.   
  3. Very carefully heat oil in pan (or heat deep fryer) until it is around 350 degrees Farenheit.  You should be able to fry a cube of bread until golden brown in about 15 seconds once it’s at the proper temperature (watch closely and reduce heat if oil begins to smoke).
  4. Drop a few battered blossoms at a time into the oil.   Cook until puffed and golden brown, approximately 2 minutes.  Using a slotted spoon, remove blossoms from heat and drain on a layer of paper towel.   
  5. Repeat the frying process with remaining blossoms.  Sprinkle with sea salt and a squeeze of fresh lemon juice and serve immediately.

Bon Appetit and Enjoy!


Souvlaki, Tzatziki Sauce and Greek Style Salad

28 07 2008

I was at a Farmer’s Market Saturday and picked up some beautiful red peppers, garlic, cucumbers and early field tomatoes.  While trying to decide what to make for dinner last night, I realized that I had the beginings of a Greek-style dinner.  I have some fresh oregano growing in my herb garden so I only needed a few additional ingredients to put together a light, refreshing dinner that can be made on the grill, which is ideal for keeping the kitchen cool on a hot summer day.   I usually make my souvlaki with chicken breasts but you could easily substitute pork, shrimp or even firm tofu.  There are a number of steps but everything can be done in advance.

Souvlaki

Serves 4

(Can be adapted to be VEGETARIAN)

Marinade:

  • 2 Tablespoons olive oil
  • Juice from 1 lemon (seeds removed), approximately 1/3 cup juice
  • 1 teaspoon finely chopped fresh oregano
  • 1/2 teaspoon salt
  • 1/2 clove garlic, finely minced
  • Generous amount of freshly ground black pepper

For skewers:

  • 4 boneless, skinless chicken breasts (or subsitute shrimp, pork or firm tofu), cut into 2″ cubes
  • Skewers – metal or bamboo  (if using bamboo skewers, soak them in water for approximately 20 minutes prior to using so they don’t burn on the grill)
  • 1 small green pepper, seeded and cut into 1″ cubes
  • 1 small red pepper, seed and cut into 1″ cubes
  • 1 small red onion, skin removed, cut into 1″ cubes
  1. In a large bowl combine all ingredients.  Toss meat (or tofu) so it is coated in marinade.  Cover and refrigerate for at least 1 hour.
  2. To assemble skewers, alternate putting the following ingredients onto the skewers: one piece of green pepper, one piece of red pepper, one piece of onion, one piece of chicken.   Like this:
  3. Helpful Tip: I try to buy flat bamboo skewers so the meat and vegetables don’t spin around the skewer when I turn them over on the grill.  If you can’t find flat ones, you can use two skewers so your souvlaki will stay in place.
  4. Repeat until all chicken is used up (there may be additional vegetables left over, you can do a couple of veggie skewers to use up the pieces.  Brush with marinade before grilling).
  5. Light your grill (alternately, skewers can be cooked under your oven’s broiler or on an indoor grill).  Once the grill is hot, cook skewers until browned on one side and turn over, approximately 7 minutes per side, depending on how hot your grill is.   Continue cooking until meat is cooked through.
  6. Remove from grill.  Serve with tzatziki sauce, salad (recipes follow) and grilled pita bread.

Tzatziki Sauce

Makes approximately 1 cup of sauce

(VEGETARIAN)

Note: the yogurt needs to drain for at least 5 to 6 hours before mixing with the garlic, cucumber and dill.

  • 1 cup plain yogurt (not low-fat)
  • Cheesecloth
  • 2 cloves garlic, finely minced  (for garlic lovers – reduce to one clove for a milder sauce!)
  • 1/2 cucumber, peeled, seeded and cut into 1/2″ dice
  • 1 Tablespoon fresh dill, finely chopped
  • Salt, to taste
  1. Line a strainer with cheesecloth (double thickness).  Spoon the yogurt into the cloth.  Cover with plastic wrap, place strainer over a bowl and refrigerate for 5 to 6 hours or overnight.   Liquid will drain from the yogurt, making it thick and cheese-like.
  2. When ready to use, discard the water that has collected in the bowl.  In a medium mixing bowl, mix together the thick yogurt, cucumber, dill, garlic and salt.
  3. Cover and refrigerate until ready to use. 


Greek Style Salad

(VEGETARIAN)

Dressing:

  • 1 teaspoon finely chopped fresh oregano
  • 1/2 clove garlic, finely minced
  • 3 Tablespoons olive oil
  • pinch of salt
  • 1 teaspoon white wine vinegar
  • 2 teaspoons lemon juice
  • 1/2 teaspoon dijon mustard
  • Fresh ground black pepper, to taste
  1. Combine all ingredients and whisk until blended

Salad:

  • 2 cups (packed) mixed salad greens
  • 1/2 cucumber, cut into chunks
  • 1/4 red onion, peeled and cut into thin rings
  • 1/2 red pepper, cut into thin strips
  • 1/2 green pepper, cut into thin strips
  • 12 grape or cocktail tomatoes, cut in half
  • 3/4 cup (4-1/2 oz. or 125 g) crumbled feta cheese
  • Handful of black olives (optional)
  1. In a large salad bowl, add all ingredients and toss to mix.  Add dressing to coat salad greens and toss.  Serve with souvlaki kebabs.

Bon Appetit and Enjoy!


Cherry Almond Bread

25 07 2008

cherries

Last summer my husband Allan and I stayed at a beautifully restored villa near Cortona, Italy in the Tuscan countryside.  It was called Villa di Piazzano and the buildings and surrounding views were exactly how I envisioned Tuscany after reading Frances Mayes’s memoir ‘Under the Tuscan Sun’.   We stayed in the Luna Piena room (‘Full Moon’) and one night we slept with the window open so we could feel the cool evening breeze and enjoy the silence of the countryside (we live in the city so it was a welcome break!).  In the morning, the smell of baking from the kitchen below us woke me up.  When we went down to breakfast, there was a table full of local sheep’s cheeses, Tuscan fennel salami, juices and fantastic baked goods such as sweet breads and pastries.  I developed this Cherry Almond Bread so we could enjoy a similar type of breakfast on occasion.    The recipe calls for sweet cherries instead of sour ones – the sweet ones are usually a very dark reddish-burgundy.

The view from the Luna Piena room at Villa di Piazzano, Cortona, Italy


Cherry Almond Bread

(VEGETARIAN)

A note about pitting cherries: There are various methods you can use to pit cherries including buying a cherry/olive pitter.  Some people swear by using a chopstick to poke the pit through the cherry while others use the tip of a knife to dislodge it.  Because this recipe does not call for a lot of cherries, I simply cut around the middle of the cherry from top to bottom (cutting through the diametre until you hit the pit) and gently pull apart the two halves, using the tip of the knife to remove the pit.   This will minimize the mess and give you two nice halves.

  • 1-1/2 cups + 2 Tablespoons all purpose flour
  • 1/4 teaspoon salt
  • 3/4 cup sugar
  • 1-1/2 teaspoons baking powder
  • 1/2 teaspoon baking soda
  • 2 eggs
  • 2/3 cup neutral oil (such as safflower or canola)
  • 1/2 cup sour cream
  • 1/2 teaspoon vanilla extract
  • 1 teaspoon almond extract
  • 1 full cup (rounded) pitted, halved sweet cherries (see note at top for pitting advice)

Topping:

  • 1/4 cup slivered almonds
  • 1-1/2 teaspoons sugar
  1. Preheat oven to 375 degrees Farenheit.  Grease a standard size loaf pan and set aside.
  2. In a small bowl, combine the cherry halves and 2 Tablespoons of flour.  Toss to coat the cherries and set aside.
  3. In a large mixing bowl, combine 1-1/2 cups flour, the salt, sugar, baking powder and baking soda.  Stir to combine.
  4. Add the eggs, oil, sour cream, vanilla and almond extracts to dry ingredients.  Stir until just combined (the mixture will be quite thick). 
  5. Gently fold cherries into batter, stirring carefully to mix.  Spoon into greased loaf pan.  Top with slivered almonds and sugar.
  6. Bake for approximately 35 to 40 minutes, or until a knife inserted in the middle comes out clean.  Let cool, remove from pan and cut into slices.

Bon Appétit and Enjoy!

cherry-almond-bread