Cheddar Herb Biscuits

30 09 2010

Freshly baked biscuits flecked with herbs and cheddar are the perfect accompaniment to a hearty bowl of soup

Now that fall has arrived and the weather has cooled, it’s soup season!  I love making soup and am always experimenting with different ingredients to come up with hearty versions that are a meal on their own (see below for links to my favourite soup recipes).  Of course, crackers or bread are classic accompaniments to a comforting bowl of soup but why not try something different by making some hot, fresh biscuits?

Some people are a bit intimated by working with biscuit dough but it’s not difficult if you follow a few guidelines. To make flaky and flavourful biscuits, here are a few tips:

  • Use cold, unsalted butter – don’t substitute margarine.
  • Don’t handle the dough too much.  This will make the biscuits tough and melt the butter, keeping them from puffing up during baking.
  • Use a wire pasty cutter (or two sharp knives) to cut the butter into the flour mixture.  The dough should look like small, coarse pebbles once the dough has been thoroughly mixed in.
  • Baking powder is the key ingredient to help the biscuits rise.  Make sure your powder is fresh and still active.
  • Buttermilk gives the biscuits a nice tangy flavour.  If you don’t have buttermilk, check out these Buttermilk Substitutes.  Regular milk is ok in a pinch but the biscuits won’t be quite the same.
  • Use old or extra old cheddar for the best flavour.
  • Cook the biscuits in a hot oven (450 degrees Fahrenheit) that has been adequately pre-heated.

Cheddar Herb Biscuits

Makes about 12 biscuits

  • 2-1/4 cups all-purpose flour, plus extra for dusting the countertop
  • 4 teaspoons baking powder
  • 1 teaspoon salt
  • 1 teaspoon sugar
  • 1 Tablespoon finely chopped fresh chives
  • 2 teaspoons very finely chopped fresh thyme leaves
  • 1 cup (packed) grated old cheddar cheese
  • 5 Tablespoons cold unsalted butter
  • 3/4 cup buttermilk
  • 1 large egg
  • 1 teaspoon dijon mustard
  1. Preheat the oven to 450 degrees Fahrenheit.
  2. In a large mixing bowl, add flour, baking powder, salt, sugar and chopped herbs. Stir with a fork until combined.
  3. Add the grated cheese and use your fingers to gently distribute it through the dough so it’s not all in one clump.
  4. Cut the butter into small pieces and add to the flour mixture.  Using a wire pastry cutter or two sharp knives, cut the butter into the dough until it looks like small pebbles.
  5. In a mug or glass measuring cup, add the buttermilk, egg and mustard and stir with a fork until smooth.  Pour into the flour mixture and gently mix together until the dough just holds together.
  6. Sprinkle some flour onto a clean countertop and turn out the dough onto the counter.  Use your hands to shape it so it just holds together.  Flatten the dough so it’s in a circle about 1″ thick.
  7. Use a cookie cutter or the top of a glass to cut out round biscuits (a 2-1/2″ circle is a good size).  Place the biscuits into a pie plate or baking dish so they are just touching one another.  Re-form any dough scraps and cut out the remainder of the biscuits.
  8. Let the biscuits rest in a warm place for 15 minutes.  Place the oven rack in the centre position and bake the biscuits for 15 minutes or until they are golden on top.
  9. Remove from the oven and let cool slightly before serving.

Here are a few of my favourite hearty autumn soups to go with the biscuits:

Beef, Barley and Mushroom

Peppery Leek and Potato

Curried Parsnip Soup

Corn Chowder with Bell Peppers

Cabbage Roll Soup

Chicken Noodle

Mushroom Soup

Seafood Chowder

Curried Parsnip Soup topped with a few cooked mussels

Bon Appétit and Enjoy!

Get updates for The Seasonal Gourmet on Twitter and Facebook.  Join the conversation today!


Exciting News!

28 09 2010

I have decided to embrace social media and have set up accounts for The Seasonal Gourmet on Twitter and Facebook.  I’ll be posting updates, photos and other food-related points of interest on a regular basis. Check out the links and share them with any fellow food-lovers!

Join the conversation at:

Facebook: The Seasonal Gourmet

Twitter: http://twitter.com/seasonalgourmet

Hope to see you there!

Trish


Pumpkin Spice Muffins

26 09 2010

A bin of pumpkins at Jean Talon Market, Montreal

If there is one flavour that really says ‘autumn’ it’s pumpkin.  Pumpkin pie is a staple at Thanksgiving and in the past few years I’ve seen everything from pumpkin fudge to ice cream once fall arrives. Some coffee shops even make pumpkin lattes. Combined with warming spices such as cinnamon, nutmeg and allspice, pumpkin is a delicious seasonal treat.

To make things easy, I use canned pumpkin puree instead of fresh pumpkin for this recipe.  While fresh pie pumpkins can certainly be used, the quality of the finished product can vary due to the water content of different pumpkins (for a guideline on how to prepare puree from pie pumpkins, check out How to Prepare Fresh Pumpkins for Baking).  If you’re using canned pumpkin, make sure it’s labelled as pumpkin puree and not pumpkin pie filling, which already has spices added.

To make big, puffy bakery-style muffins, fill the muffin tins up almost to the top. Make sure you grease the top of the tin so that the muffin tops don’t stick.  If the muffins ‘grow’ together during baking, just cut them apart with a knife.

Pumpkin Spice Muffins

Makes about 8 large muffins

  • 1-1/2 cups unbleached all purpose flour
  • 1-1/2 teaspoons baking powder
  • ½ teaspoon baking soda
  • ½ teaspoon salt
  • 1 cup sugar
  • 1 teaspoon ground cinnamon
  • ½ teaspoon grated nutmeg
  • ¼ teaspoon ground cloves
  • ½ teaspoon ground allspice
  • ¼ teaspoon ground ginger
  • 1-1/2 cups fresh or canned pumpkin puree (not pumpkin pie filling)
  • 1/3 cup neutral oil, such as canola or safflower
  • 2 large eggs
  • 1/3 cup chopped pecans or walnuts
  • Oil or cooking spray to grease muffin tin

Topping:

  • ½ teaspoon ground cinnamon
  • 1 teaspoon sugar
  • ¼ cup chopped pecans or walnuts
  1. Preheat oven to 350 degrees Fahrenheit. Grease muffin tin (including top of tin) and set aside.
  2. In a large mixing bowl, add flour, baking powder, baking soda, salt, sugar and spices. Stir with a fork until thoroughly combined.
  3. Add pumpkin puree, oil and eggs, and stir into the dry ingredients until smooth. Gently fold in nuts until distributed throughout batter.
  4. To make topping: In a small bowl, stir together sugar and cinnamon. Reserve chopped nuts in a separate bowl.
  5. Spoon batter into greased muffin cups, filling them to about ½” from the top of the cups. Sprinkle the batter of each muffin with cinnamon/sugar mixture and a spoonful of chopped nuts.
  6. Bake muffins for 25 to 30 minutes or until a knife inserted in the middle comes out clean. Remove muffin tin from the oven and let cool at least 15 minutes before removing the muffins.

This recipe first appeared on Suite 101.com.

Bon Appétit and Enjoy!

Pumpkin Spice Muffins


Autumn Has Arrived!

23 09 2010

Brilliant foliage is one of the highlights of fall

It’s finally fall and I couldn’t be happier.  Sure summer is fun, with warm weather, lazy days at the beach and barbecues with friends.  But fall is my favourite season with the brilliant foliage, rich fall fashions, crisp weather and of course, the food.

Many passionate home cooks consider fall the kick off to the ‘cooking season’.  Once the weather cools, we can resume baking, roasting and braising.  The markets are piled high with produce and we crave hearty soups and stews after a vigorous afternoon of leaf raking or a hike in the park.  It’s a time to light the fireplace, prepare a rustic dinner and linger at the table with friends.

For some great ideas for using autumn’s abundance, check out some of my most popular fall recipes:

Spiced Cider

Leek and Ham Tart

Beef, Barley and Mushroom Soup

Mushroom Soup

Roasted Beet Salad with Walnuts and Feta

Braised Short Ribs

Stuffed Pork Tenderloin Wrapped with Prosciutto

Stuffed Butternut Squash

Brussels Sprouts with Bacon and Maple

Savoury Mushroom Bread Pudding

Harvest Strudel

Pumpkin Spice Muffins

Apple Caramel Tart

Pumpkin Pie with Walnut Praline

Bon Appétit and Welcome to Fall!


The Search for a Perfect Tomato – Part 2

22 09 2010

Tomatoes from Pelee Island, Ontario, September 2010

Last summer you may recall that I was on the hunt for great tomatoes. A few times over the years I’ve encountered the odd one that was bursting with flavour and had the proper texture but they are surprisingly rare. Unfortunately, Summer 2009 was cool and wet in Southern Ontario so it probably wasn’t the best time to embark upon such a quest.  However, this year we had a much better summer, with near ideal growing conditions. It was time to start my search anew.

Tomatoes ripening on the vine in Southern Ontario

As tomatoes came into season by August, I started checking out farmer’s markets and roadsides stands.  I searched during my travels to Eastern Ontario and Quebec and dutifully sampled everything from cherry tomatoes to heirlooms.  The overall quality this year was far superior to last summer’s waterlogged specimens but something was still lacking.  Where was that elusive deep and sweet flavour that I’ve been craving?

And then I found them: red, ripe, flavourful Tomatoes.

I was spending the last weekend of summer on Pelee Island with my brother-in-law Dan and his wife Jenn.  Located in the middle of Lake Erie, Pelee Island is the southernmost populated point in Canada (at 41 degrees, it shares the same latitude as Barcelona, Spain and Rome, Italy).  The island has a temperate climate that is favourable for grape growing and it is located just south of Leamington, Ontario which is known as the Tomato Capital of Canada.  Clearly, this would be a promising place to find good tomatoes.

A roadside stand on Pelee Island

We happened upon a roadside stand that was selling locally grown garlic and tomatoes, most likely picked from someone’s garden that morning.  Like many roadside stands in rural Canada, it was on the honour system – you put your money in the tin provided and make change from it if necessary.  We deposited the requisite amount and were on our way with fresh tomatoes and a few heads of garlic.  When I got home, I sliced into them and they were just about perfect: uniformly deep red throughout, juicy and sweet.

Tomatoes that are uniformly red throughout usually taste the best

I am a firm believer that when produce is at its best, preparation should be minimal. I decided to use my precious few tomatoes in classic preparations.  I ate one plain, sliced into wedges with a dash of salt and pepper.  Next, I made a BLT: combine crisp bacon, lightly toasted bread, crunchy lettuce, thickly sliced tomatoes and a little bit of mayo and you have a lunchtime masterpiece.  Later that night, I made some bruschetta to accompany dinner (see recipe below).  Finally, the next day I made a grilled cheese and tomato sandwich (they were getting a little soft so this was a good way to use the last of them).  As summer draws to a close, I’m already dreaming of next year’s tomatoes…

A grilled cheese sandwich with tomato slices pairs well with a bit of grainy mustard and pickles

Bruschetta

(VEGETARIAN)

This is more of a guideline than a detailed recipe – amounts will vary depending on how many tomatoes you have.

  • Ripe tomatoes
  • Fresh basil or oregano
  • Olive oil
  • Salt
  • White bread (baguette, ciabatta, etc), cut into slices about 1″ thick
  • 1 clove of garlic, peeled
  1. Cut tomatoes into a small dice.  Add to a small bowl.  Finely chop some fresh basil or oregano and add to the tomatoes. Drizzle with a small amount of olive oil and season with salt to taste.
  2. On a grill or under the broiler, toast one side of the bread until golden.  Rub the garlic clove over the toasted surface of each bread slice.
  3. Spoon some of the tomato/herb mixture onto each toast.  Drizzle each piece with more olive oil if desired.

Bruschetta is an easy and delicious way to showcase perfect tomatoes

For more great tomato ideas, visit the Tomato archives.

Bon Appétit and Enjoy!


Stuffed Red Peppers

9 09 2010

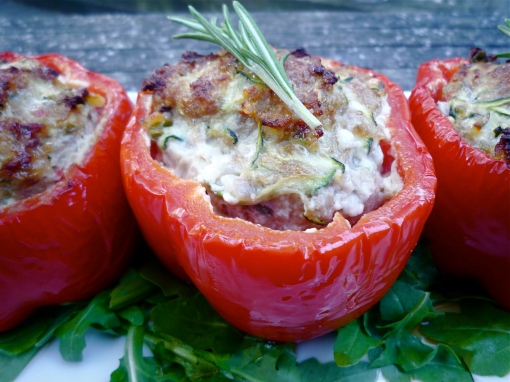
Stuffed red peppers make a hearty late summer meal

This week’s markets were awash in vivid colour as peppers hit their seasonal peak in Ontario.  I saw everything from mild poblanos to fiery hot habaneros but the most abundant were red bell and shepherd peppers.  Shepherd peppers are more elongated than bell peppers but they taste very similar and are basically interchangeable in recipes.

A red bell pepper growing in a garden near Picton, Ontario

Red peppers are just green peppers that have ripened.  However, once they turn red, the peppers become much sweeter, making them ideal for stuffing with meat, cheese, rice, grains or seafood.  This version was adapted from a recipe from an old issue of Bon Appétit magazine featuring the foods of Provence.  Stuffed vegetables are very popular in the South of France and are an excellent way to use up extra peppers or zucchini.

The recipe calls for slicing the peppers lengthwise in half and hollowing them out, however, they can also be stuffed by slicing off the top and filling the entire pepper.

A note to vegetarians: Check back soon for a meatless version!

Stuffed Red Peppers

Serves 4 to 6

  • 4 sweet or mild Italian sausages
  • 1 small zucchini (about 1-1/2″ in diameter and about 6″ long)
  • 1 small onion, minced
  • 1 clove garlic, finely minced
  • 1 teaspoon finely chopped fresh thyme
  • 1 teaspoon finely chopped fresh rosemary
  • 3/4 cup dry breadcrumbs
  • 1 large egg
  • 1/4 cup grated parmesan cheese
  • Salt and pepper, to taste
  • 4 large red bell or shepherd peppers
  • Rosemary sprigs to garnish (optional)
  1. Preheat the oven to 425 degrees Fahrenheit.
  2. Remove the casings from the sausages and place the meat in a large bowl (see Removing Sausage Casing for tips on how to do this efficiently).
  3. Trim the stem and end from the zucchini and grate it into the bowl using a box grater.  Add the onion, garlic, herbs, breadcrumbs, egg and parmesan to the bowl.
  4. Using your hands, work the ingredients into the sausage meat until the mixture is thoroughly combined.  Season with salt and pepper.
  5. Slice the red peppers lengthwise down the middle.  Trim out the stem and any seeds and ribs.
  6. Spoon the sausage mixture into each pepper half.  Place on a baking sheet or in a shallow pan and bake for 45 minutes or until the tops are beginning to brown. Garnish with rosemary sprigs if desired.

Bon Appétit and Enjoy!


Summer Lasagna with Vegetables, Sausage and Pesto

6 09 2010

Lasagna with layers of vegetables, sausage and pesto is the perfect meal to transition from summer to fall.

Today is Labour Day, which marks the unofficial end of summer. Kids are heading back to school this week and the temperature has started to cool down as autumn approaches.  It can be tricky to figure out what to eat in September because the weather can shift from hot and sunny to cool and damp within a few hours.  A lasagna packed with late summer vegetables, sweet basil pesto and a layers of hearty Italian sausage is the perfect dish to make the transition between the seasons.

There are a number of steps to assemble the lasagna, however, none are difficult and the various components can be prepared in advance.  It makes an impressive dish for entertaining and leftovers are even better the next day.

Click here to get the recipe from Suite 101.com: Summer Lasagna with Vegetables, Sausage and Pesto.

Bon Appétit and Enjoy!


Corn Relish

2 09 2010

Corn relish preserves a taste of summer

Every summer when I was a kid, my mom would make homemade pickles. By the end of August it became a ritual and her amazing dills, bread-and-butters, chow-chow and sweet pickles would last us through the winter.  It was quite a production and the house would smell of spices and vinegar before everything was sealed into mason jars and put into the cold room for the winter.

Preserving has become a bit trendy in the past few years as people re-discover how delicious and economical homemade pickles and jams can be.  I’ve been wanting to try it but unfortunately I don’t have anywhere to store the finished product. However, this week I had some leftover corn on the cob and decided to try my hand at making some corn relish.  I worked out a recipe that produces a small batch so I don’t have to worry about where I’m going to store it.  However, if you’d like to make a larger batch for canning, the recipe can be multiplied (see below for a link about safe canning procedures).  This relish is especially delicious on grilled sausages and hot dogs.

Corn Relish

(VEGETARIAN)

Makes about 4 cups

  • 1-1/2 cups white vinegar
  • 1/2 cup white sugar
  • 1/4 cup brown sugar
  • 1 teaspoon salt
  • 3 Tablespoons prepared (yellow) mustard
  • 2 teaspoons dry mustard
  • 1/2 teaspoon celery salt
  • 1/2 teaspoon turmeric
  • 1/2 teaspoon red pepper flakes
  • 3 cups raw corn kernels, cut from about 5 cobs
  • 1 stalk celery, finely diced
  • 1 small or 1/2 large red onion, finely diced
  • 1/2 cup diced red bell pepper (about 1/2 a large pepper)
  • 1/2 cup diced green pepper
  • 2 Tablespoons flour
  • 3 Tablespoons cold water
  1. In a large sauce pot, add vinegar, white sugar, brown sugar, salt, prepared mustard, dry mustard, celery salt, turmeric and red pepper flakes.  Whisk together and bring to a simmer on medium-high heat.
  2. Once the vinegar mixture has come to a simmer, add the corn, celery, onion and diced peppers.  Stir to combine and reduce heat to medium-low.  Gently simmer for 20 minutes.
  3. In a glass mixing cup or mug, whisk together flour and water until fully combined and free of lumps.  Pour flour mixture into the relish mixture and whisk well.  Turn the heat to medium-high and simmer the mixture until it begins to thicken, about 5 minutes.
  4. Let the relish cool and place into jars.  It will keep in the fridge for about a week. If you want to can the jars to store, you can follow these instructions for safe canning procedures: Canning Pickles.

Bon Appétit and Enjoy!