Radicchio and Scamorza Risotto

15 03 2011

Scamorza Affumicate: A smoked cheese that is similar to mozzarella and provolone

I recently returned from a trip to northern Italy and have been busy working on my own versions of some of the dishes I enjoyed there. One of those dishes was a smoky risotto with sautéed radicchio that I had one day for lunch.  It was a cool, rainy day and the hearty richness of the risotto paired with a glass of Piedmontese wine was the perfect way to warm up.

Sourcing Ingredients

Scamorza is a cheese that is similar to provolone or mozzarella.  The smoked version (affumicate) is darker in colour and has a firm smoky rind and soft interior. Scamorza affumicate can be found at many cheese shops but you can substitute smoked mozzarella or smoked provolone if you can’t find it.  The scamorza rind is edible but won’t melt as easily so it can be trimmed if desired.

Radicchio at an Italian market

Radicchio is a leafy vegetable that is related to chicory.  Raw radicchio can be quite bitter but it mellows when sautéed or grilled. It can usually be found near the lettuce or cabbage in supermarkets and is easily recognizable by its bright purple leaves.

If it is your first time making risotto, you might find this primer helpful for information about ingredients: Basic Risotto.

Radicchio and Scamorza Risotto

Makes about 4 servings as a starter

(VEGETARIAN)

  • 2 Tablespoons extra virgin olive oil
  • 1 small onion, finely diced
  • 2 cups chopped radicchio (about 1 small head), plus extra for garnish and to make radicchio ‘cups’ (optional, see below)
  • 1 cup raw carnaroli rice (you can use arborio if carnaroli isn’t available)
  • 1/2 cup dry white wine
  • About 3-1/2 to 4* cups chicken or vegetable stock – be sure to use vegetable stock if cooking for vegetarians
  • 4 oz. (113 grams) smoked scamorza cheese, cut into 1/2″ cubes (equals about 3/4 cup of cubed cheese)
  • 1 Tablespoon unsalted butter
  • Salt, to taste
  1. In a large deep skillet or enameled cast iron pot, heat olive oil on medium-high heat.  Add onion and cook until it’s beginning to soften, about two minutes.  Add the radicchio and sauté for another two minutes, stirring occasionally.
  2. Add rice and sauté for another 2 minutes, stirring periodically.  Pour in the wine and stir the rice.  Reduce heat and let simmer gently until the wine is completely absorbed, about 3 minutes.
  3. Once the wine has completely absorbed, add 1/2 cup of the stock.  Let the rice simmer gently, stirring occasionally.  Once the stock has almost fully absorbed (about 4 minutes), add another 1/2 cup of the stock.
  4. Repeat the process of adding the stock a half-cup at a time once it has almost absorbed. Continue until the rice is creamy and cooked through but still has a very slight ‘bite’ in the middle of the grains (al dente).  Stir the rice on occasion and keep an eye on it.  It will take approximately 6 to 7* additions of stock in half-cup increments (*Note: the rice may require a little more or less stock, depending on how absorbent it is).
  5. Once the rice is cooked to the desired tenderness, remove the pan from the heat and add the butter and cheese. Stir into the risotto until completely melted.  Season with salt to taste.
  6. To serve: If you want to make radicchio ‘cups’, trim off the root end of a fresh head of radicchio. Carefully peel back the whole leafs, making sure not to tear them. Arrange three or four leaves on a plate in a circle to make a cup shape. Fill with risotto and garnish with a small amount of fresh chopped radicchio.

Bon Appétit and Enjoy!

Get updates from The Seasonal Gourmet on Facebook and Twitter.  Join the conversation today!

Radicchio and Scamorza Risotto in a radicchio cup

Copyright Trish Coleman. Please contact the author to obtain permission for republication.


Creamy Tomato Soup

19 01 2011

Tomato Soup with a grilled cheese sandwich is a classic cold weather meal

Tomato soup is a classic winter favourite.  Paired with crackers or a grilled cheese sandwich, it’s the perfect meal on a cold and gloomy day. Canned soup is quick and easy but making your own doesn’t take a lot of effort and you can control how much salt and additives are in the finished product. It can also be made in advance and re-heated for an easy meal on busy days.

Obviously tomatoes are not in season right now but canned tomatoes work beautifully for this recipe. Try to use good quality tomatoes that don’t have a lot of added salt or citric acid. I like Aurora brand diced tomatoes because they have good flavour, don’t have any additives and are affordable.  San Marzano tomatoes are also a good choice but they tend to be a bit more expensive.

Creamy Tomato Soup

Makes about 4 servings – can easily be doubled

(Can be made VEGETARIAN)

  • 2 Tablespoons unsalted butter
  • 1 small onion, diced
  • 1 clove garlic, chopped
  • 1 teaspoon chopped fresh thyme or 1-1/2 teaspoons dried
  • 1/2 teaspoon red pepper flakes (or to taste)
  • 2 cups chicken or vegetable stock (use vegetable stock if serving vegetarians)
  • 28 oz. (796 g) can of tomatoes
  • 1/2 cup whipping cream or evaporated skim milk
  • Pinch of sugar, to taste (optional – it’s to balance the acid in tomatoes)
  • Salt and pepper, to taste
  • Grated swiss, parmesan or old cheddar cheese to garnish (optional)
  1. In a large saucepan or medium enameled cast-iron pot, heat the butter on medium-high heat until melted. Add the onion and sauté until it’s just beginning to soften, about 4 minutes.
  2. Add garlic, thyme and red pepper flakes. Continue to cook for another two minutes.
  3. Pour in the stock and tomatoes. Break up the tomatoes with a large spoon and let the soup gently simmer, uncovered, for about 20 minutes (don’t let it come to a hard boil).
  4. After 20 minutes, remove the pot from the burner and let the soup cool for a few minutes.  Carefully puree the soup mixture with a hand blender until smooth (or transfer to a regular blender and puree – use extreme caution with hot liquids).
  5. Return the pureed soup to the pot and place back on the burner. Season with salt, pepper and a pinch of sugar, if necessary. Add the cream and stir until combined.  Heat on medium until the soup is hot.  Season to taste with additional salt and pepper.
  6. To serve, top with grated cheese and fresh ground pepper if desired. Serve with crackers, sandwiches or Cheddar Herb Biscuits.

A tip for freezing: Prepare the soup as directed but don’t stir in the cream/evaporated milk at the end.  Freeze the pureed tomato base.  To thaw and prepare: Defrost the frozen soup base and place in a pot.  Add the cream/milk as directed and season as necessary.

Bon Appétit and Enjoy!

Copyright Trish Coleman. Please contact the author to obtain permission for republication.

Get updates from The Seasonal Gourmet on Facebook and Twitter.  Join the conversation today!


How to Make Perfect Mashed Potatoes

24 11 2010

Creamy, buttery mashed potatoes are a must at any holiday table.

When it comes to favourite comfort foods, mashed potatoes are near the top of my list.  They are the perfect side to serve with gravy-based dishes such as turkey and roast beef and no holiday table would be complete without them.

The great thing about potatoes (aside from being delicious) is that they are very inexpensive and readily available year-round.  I’m from New Brunswick, Canada, which is a major potato-producing region (McCain’s, the world’s largest producer of frozen french fries, is based there). A couple of years ago, I saw a roadside sign near Fredericton advertising 50 pounds of potatoes for $9.99 so it’s no surprise that they were a staple at our dinner table almost every night.

Potatoes may not look exciting but they are very versatile.

To make smooth, creamy mashed potatoes, here are a few tips that will ensure success:

  • Choose starchy potatoes such as Russets (also known as Idaho or baking potatoes).  Yukon Golds also work well and have a nice buttery interior.  Avoid waxy ‘boiling’ potatoes such as fingerlings or red potatoes.
  • Cutting the potatoes into chunks will speed the cooking process.  You can peel them before cooking for a nicer presentation but sometimes I leave the skins on for texture and nutrients.
  • Use a potato ricer to ensure smooth, lump-free potatoes.  A potato ricer looks like a giant garlic press and you push the cooked potatoes through tiny holes, resulting in potato strands that look like rice.  Ricers are available at most kitchen stores.  Do not use a mixer to beat them – they will become gluey.
  • Season well! Potatoes can handle a lot of salt and seasonings such as garlic, horseradish or chopped herbs (see below for more ideas).  Be sure to add butter and dairy while the potatoes are still hot so everything melts and combines easily. Add seasonings gradually and taste as you go.

Preparing Mashed Potatoes in Advance

Trying to drain and mash potatoes when you have guests waiting for dinner can be messy and cumbersome. Luckily, mashed potatoes can be prepared in advance and kept warm or re-heated. There are two methods that work well:

  1. Place mashed potatoes in a metal bowl over a pot of gently simmering water. Cover loosely with foil. Stir occasionally and check moisture and seasoning before serving.
  2. Cooked mashed potatoes can be kept warm in a slow cooker set to ‘Low’. Check and stir on occasion, as they can become dry around the edges.

Optional Additions

While plain mashed potatoes are a delicious on their own, they can be further enhanced with some of the following (measurements are approximate – add to taste):

  • Grated horseradish – 2 to 3 Tablespoons or to taste
  • ¼ cup of sour cream plus ½ chopped green onion
  • 2 cloves minced garlic
  • 1 head roasted garlic, squeezed out of its skin
  • 1 cup grated sharp cheddar cheese

Mashed Potatoes

Evaporated milk or regular milk can be substituted for the cream but the results will not be as creamy and rich.

Makes 4 to 6 servings

(VEGETARIAN)

  • 6 large russet potatoes (about 2-1/2 lbs.), peeled and cut into thirds
  • ½ cup heavy cream (whipping cream), heated
  • 6 Tablespoons unsalted butter, at room temperature and cut into pieces
  • Salt, to taste
  • A large stockpot with a lid
  • 1 Tablespoon salt
  • Water, to cover potatoes
  • Potato ricer
  1. In a large stockpot, add potatoes, 1 Tablespoon salt and enough water to just cover the potatoes. Cover and bring water to a boil.
  2. Remove cover and reduce heat to medium-high. Gently boil until potatoes are very tender, about 20 to 25 minutes. Check with a sharp knife periodically to determine tenderness.
  3. Drain cooked potatoes. Place two or three potato chunks in the potato ricer. Working over a large bowl, press potatoes through ricer. Repeat with all potatoes.
  4. Quickly add butter and cream to hot potatoes. Stir until combined and the potatoes are creamy. Add salt to taste. Add any optional seasonings and mix until incorporated.
  5. Serve with your favourite dishes such as braised short ribs, roast chicken or turkey with gravy.

Copyright Trish Coleman. Please contact the author to obtain permission for republication.

Bon Appétit and Enjoy!

This article first appeared on Suite 101.com.

Get updates from The Seasonal Gourmet on Facebook and Twitter.  Join the conversation today!


Stuffed Butternut Squash

2 11 2010

Butternut squash can be stuffed to make an elegant vegetarian dish

My brother-in-law Dan is a vegetarian so I’m always trying to come up with interesting dishes so he’ll have something special to enjoy at Thanksgiving and Christmas.  I enjoy the challenge and it encourages those of us who eat meat to try some new dishes as well.  I made this butternut squash stuffed with wild rice and herbs last year and it was a hit.  It makes quite a bit so you should have plenty to serve as either a vegetarian main course or as a side dish.  It is delicious with pork, chicken or turkey. I can easily be adapted for vegans- just follow the substitutions at the end of the recipe.

Stuffed Butternut Squash

(VEGETARIAN)

Makes about 8 to 10 servings as a side dish or 4 to 6 servings as a main course

  • 1 medium butternut squash
  • 2 teaspoons neutral oil such as safflower

Stuffing:

  • ½ cup raw wild rice
  • ½ cup raw white rice
  • 2 cups vegetable stock
  • ½ medium onion, finely diced
  • ½ cup red pepper, finely diced (about ½ a large pepper)
  • 2 cloves garlic, finely minced
  • 2 Tablespoons finely chopped fresh sage leaves
  • ½ teaspoon finely chopped fresh rosemary
  • 1 teaspoon finely chopped fresh thyme
  • 2 Tablespoons melted butter OR margarine OR oil such as safflower or olive
  • Salt and pepper, to taste
  • ½ cup finely grated parmesan cheese
  1. Preheat oven to 425 degrees Fahrenheit.
  2. Using a large sharp knife, cut the butternut squash lengthwise down the middle and separate the two halves.
  3. Scoop out any seeds and discard. Rub each half of the squash with the oil (1 teaspoon per half). Place on a baking sheet and roast in the oven for 45 minutes or until tender. Check tenderness with a sharp knife – it should be soft enough to scoop out with ease.
  4. While the squash is roasting, prepare the stuffing ingredients. In a large saucepan, heat 2 cups vegetable stock until boiling. Add wild rice, cover tightly. Reduce the heat to medium and cook for 15 minutes. Add white rice to the pot and continue to cook the rice mixture for another 20 minutes or until the rice is tender and the stock has been absorbed.
  5. In a large bowl, add onion, red pepper, garlic, sage, rosemary and thyme. Once the rice mixture has cooked, add it as well.
  6. Remove baked squash from the oven and let cool slightly. Using a large spoon, carefully scoop the flesh out of the baked squash halves, making sure to leave about ¾” of a ‘wall’ intact so the shells will hold together. Add the scooped squash to the rice/stuffing bowl.
  7. Stir the cooked squash into the rice stuffing mixture until it is thoroughly combined. Add melted butter and salt and pepper to taste.
  8. Scoop the stuffing mixture back into the squash halves. Top each half with parmesan cheese or bread crumbs (1/4 cup per half).
  9. Bake stuffed squash for 20 minutes or until the cheese is beginning to brown on top. Garnish with a sprig of sage if desired.

*Vegan Adaptation:

Substitute vegan-friendly margarine, olive oil or neutral oil (canola, safflower, etc) for the melted butter. Top with ½ cup fresh breadcrumbs that have been tossed with 2 Tablespoons olive oil. Sprinkle with fresh chopped herbs. Bake stuffed squash for 20 minutes or until crumbs begin to brown.

Bon Appétit and Enjoy!

This recipe first appeared on Suite 101.com.

Stuffed Butternut Squash, garnish with a sprig of fresh sage


Roasted Beet Salad with Walnuts and Feta

20 02 2010


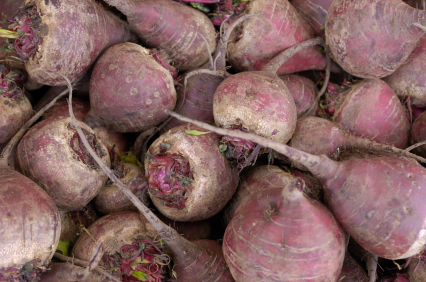
Beets in cold storage


I tend to think of salad as a summer dish, which makes sense considering all the great produce available during the summer months.  Salads are the perfect meal when it’s hot out – crisp lettuce, juicy tomatoes and sweet peppers are refreshing when the weather turns humid.  However, salads can work in colder months too. Winter salads can be made with seasonal vegetables such as beets, celery root or potatoes and often incorporate cheese, nuts or meat to make them more substantial. 

Pairing roasted beets with nuts and cheese is not a new idea; in fact, I recently tried a delicious version with gorgonzola and pistachios at Locanda Verde restaurant in New York City.  My version calls for walnuts and feta cheese but goat cheese can be substituted if you’d prefer.  A bright sherry vinegar dressing pulls all of the flavours together.  Don’t skip the pickled shallots – they take a few minutes to make but add a nice sweet-tart element to the salad.  The salad is substantial enough to be a main course but you can always adjust the servings to work as a starter.

Roasting Beets:  To roast beets with minimal mess, trim the roots and greens, if still attached (reserve the greens for another use). Peel the beets and discard peelings. Cut beets into 1-1/2″ cubes and toss in a bowl with a tablespoon of neutral tasting oil such as canola or safflower oil. Spread beet chunks on a baking sheet and roast at 425 degrees Fahrenheit for approximately 20 minutes or until beets are tender and beginning to caramelize. Wash hands immediately after handling the beets to avoid staining.

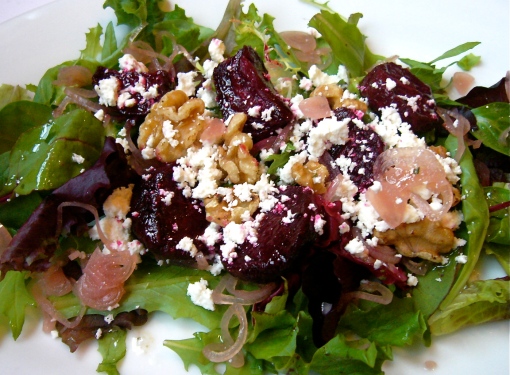
Roasted Beet Salad with Walnuts and Feta

(VEGETARIAN)

Makes 2 main course salads or 4 starter course salads

  • 4 cups mixed salad greens
  • 4 beets, cubed and roasted (see ‘Roasting Beets’ above)
  • 1 cup toasted walnut halves
  • ½ cup crumbled feta cheese or to taste
  • Pickled shallots (see recipe below)
  • Sherry Vinaigrette (see recipe below)

Pickled Shallots

  • 5 shallots, peeled and cut into thin rings (about ½ cup of shallots)
  • ¼ cup sugar
  • ½ cup white wine vinegar
  • ¼ cup red wine vinegar
  1. In a saucepan, combine sugar and vinegar and stir until combined. Bring to a boil and add shallots.
  2. Let mixture simmer on medium heat for 5 minutes. Remove from heat and let stand until it cools.
  3. Drain vinegar and use pickled shallots as desired

Sherry Vinaigrette

  • 3 Tablespoons of neutral oil such as canola or safflower
  • 1 Tablespoon sherry vinegar
  • ½ teaspoon Dijon style mustard
  • A pinch of salt
  1. In a small bowl, add all ingredients and whisk until combined.

To Assemble Salads:

  1. In a large bowl, toss mixed greens with enough vinaigrette to moisten leaves. Assemble greens on plates.
  2. Top greens with beets, walnuts, feta and shallots. Lightly toss each serving until ingredients are combined. Drizzle with more vinaigrette if desired.

Bon Appétit and Enjoy!

This article first appeared on Suite 101.com.

Roasted Beet Salad with Walnuts and Feta