Vietnamese-Style Rice Noodles with Spicy Pork

4 09 2011

Vietnamese-Style Rice Noodles with Spicy Pork

It may be September but don’t be fooled by the calendar – it’s still summer and many areas continue to be hot and humid! A refreshing Vietnamese-inspired noodle dish with crisp vegetables, fresh herbs and spicy pork is the perfect dish to cool down with.

A Note About Ingredients

When I first started this site, just over three years ago, my goal was to present recipes with ingredients that were accessible to most people in North America, whether they lived in large cities or rural areas (like most of my family does). At the time, that meant that anything remotely exotic had to be excluded. However, over the past couple of years, even grocery stores in small towns now carry ingredients from around the world (well, not every small town, but the situation is improving in most places!). The ingredients for this recipe should be readily available anywhere with the possible exception of fish sauce (nuoc mam), rice vermicelli (banh pho) and oyster sauce. Any city with a large Asian population will have markets where you can buy these items; in smaller centers check the rice isle and condiment section (some stores also place imported items under ‘Ethnic Foods’).  A Taste of Thai and Thai Kitchen brands are often carried in large supermarket chains. For substitutions, check out the Cook’s Thesaurus: Asian Condiments.

Some Vietnamese and Thai pantry basics: (from left) Thai fish sauce, rice vermicelli (banh pho), Three Crabs brand fish sauce, Thai rice stick noodles, oyster sauce.

Note: This recipe should be suitable for gluten-free diets, however, check the label of the fish sauce and oyster sauce to ensure that no gluten was used in their preparation.

Vietnamese-Style Rice Noodles with Spicy Pork

Makes 4 to 6 servings

This recipe is a little long and requires a bit of prep work but it’s very simple if you take it step-by-step. You will need about three limes total for the juice and garnish. Be sure to use fresh herbs to garnish – they will make the dish come together.

Dressing:

  • 3 Tablespoons fresh lime juice
  • 1-1/2 Tablespoons fish sauce (preferably Three Crabs brand but any kind will do)
  • 3 Tablespoons vegetable oil (canola or safflower work well)
  • 1-1/2 Tablespoons sugar
  • 2 large cloves garlic, very finely minced
  • 3 Tablespoons very finely minced shallot
  • 1 teaspoon red pepper flakes
  • Pinch of salt
  1. In a small bowl or measuring cup, add all ingredients and whisk until combined. Set aside until ready to use.

Spiced Pork:

  • 2 teaspoons vegetable oil
  • 450 g / 1 lb. lean ground pork
  • 2 cloves garlic, very finely minced
  • 1 medium shallot, minced
  • 3 Thai bird chiles, finely minced or 1-1/2 teaspoons red pepper flakes (or to taste)
  • 3 X 1” pieces lemongrass (eliminate if you can’t find it)
  • 1 Tablespoon fresh lime juice
  • 1 Tablespoon oyster sauce
  • 1 Tablespoon fish sauce
  • 2 teaspoons brown sugar
  • 1 teaspoon coarsely ground black pepper
  • Salt, to taste
  1. In large skillet, heat the vegetable oil on medium-high heat. Add the ground pork and use a spatula to break it up. Cook for one minute.
  2. Add the garlic, shallot, chiles and lemongrass pieces. Stir into the pork until thoroughly combined. Cook the mixture until the pork is just past pink, about 5 to 7 minutes.
  3. Add the lime juice, oyster sauce, fish sauce, brown sugar and pepper. Stir to combine. Reduce the heat to medium and let simmer for another two minutes. Remove the lemongrass pieces and discard.
  4. Season the pork mixture with salt and set the mixture aside until ready to use.

Noodles and Vegetables:

  • 12 oz. / 340 grams dry rice vermicelli noodles (banh pho – about 3 mm wide – if these aren’t available any kind of flat rice noodle will work)
  • 1 medium English cucumber
  • 1 medium carrot
  • 1 medium red pepper
  • 1 cup bean sprouts or ½ cup shredded lettuce
  1. To prepare the noodles: Bring a pot of water to a boil. Drop in the dry noodles and cook for about 3 minutes or until just tender. Drain and rinse with cold water to halt the cooking. Place in a bowl and set aside until ready to use.
  2. To prepare the vegetables: Slice the cucumber into rounds, about   1/8“ thick. Discard the ends.
  3. Peel the carrots and cut into thin matchsticks and cut the red pepper into thin strips.

Garnishes:

  • Fresh cilantro
  • Fresh mint
  • ¼ cup dry roasted peanuts, chopped
  • Fried shallot rings (see below)
  • 1 lime, cut into 6 wedges

Fried Shallot Rings:

  • 1 medium shallot
  • Vegetable oil – enough to cover the bottom of a small saucepan about ½” deep
  • Pinch of salt
  1. Peel the shallot and slice into thin rings. Heat the oil in a small saucepan on high. Add the shallot rings and fry until golden and crispy, about 3 to 4 minutes. Make sure you don’t overcook them or they will become bitter.
  2. Use a slotted spoon to remove the rings from the oil and set them aside on a piece of paper towel. Sprinkle with a pinch of salt and set aside until ready to use.

Putting it All Together:

  1. Place the softened noodles in a large bowl. Add the sliced cucumber, carrot and pepper strips and bean sprouts.
  2. Pour in the dressing and toss until everything is coated and thoroughly combined.
  3. Plate the noodles and top with the spiced pork. Garnish with torn fresh coriander and mint, chopped peanuts and fried shallot rings. Serve with lime wedges on the side to squeeze over the dish when served.
  4. The dish can be served warm or at room temperature.

Bon Appétit and Enjoy!

Get updates from The Seasonal Gourmet on Facebook and Twitter.  Join the conversation today!

Copyright Trish Coleman. Please contact the author to obtain permission for republication.


Herb Roasted Chicken

3 04 2011

Crispy skinned and juicy, an herb roasted chicken makes a delicious and elegant dinner

Roast chicken is a classic dinner and perfect in any season.  However, I particularly enjoy it in early spring because it’s a bit lighter than some of the heavier dishes we enjoyed through the winter yet is still hearty and comforting when the weather remains cool. It’s also versatile and can be served with any number of side dishes, from Roasted Green Beans with Shallots to Celery Root Slaw.  And of course mashed potatoes are a must to soak up the delicious gravy. For more great ideas on how to use leftover roast chicken, check out my article Three Delicious Ways to Use a Rotisserie Chicken.

Bigger Isn’t Always Better

To keep the breast meat from drying out and the cooking time reasonable, select a smaller chicken weighing around 3 lbs. (1.5 kg). It will only take about 80 minutes to roast, which keeps the white meat from becoming stringy and dry. If you’re serving a crowd, consider roasting two smaller birds instead of one that’s twice the size so the roasting time will remain relatively short and the meat will stay juicy.

Boost the Flavour

Tucking herb infused butter under the skin before roasting keeps the meat moist but also adds flavour. Filling the cavity with fresh herbs, onion and garlic helps flavour the chicken and adds depth to the juices, resulting in delicious gravy. Use fresh herbs instead of dried for a brighter flavour. Fresh sage, rosemary, thyme and parsley are readily available year round at most supermarkets.

Juicy Herb Roasted Chicken

Serves 4 to 5

  • One chicken weighing about 3 lbs. (1.5 kg.)
  • 6 sprigs fresh thyme
  • 2 sprigs fresh rosemary
  • 2 sprigs fresh sage
  • 1 small onion, peeled and cut into quarters
  • 2 garlic cloves, peeled and lightly crushed
  • 2 Tablespoons olive oil, divided
  • Pinch of salt and pepper

Herb Butter:

  • 3 Tablespoons unsalted butter at room temperature
  • 1 teaspoon finely chopped fresh sage
  • ½ teaspoon finely chopped fresh rosemary
  • 1 teaspoon finely chopped fresh flat leaf (Italian) parsley
  • ½ teaspoon finely chopped fresh thyme
  • ½ garlic clove, very finely minced
  • Pinch of salt and fresh ground pepper

Gravy:

  • 1 cup chicken stock, preferably sodium-reduced
  • 3 Tablespoons flour
  • 2 Tablespoons dry white wine (optional)
  • Salt and pepper, to taste

To Make Herb Butter:

  1. In a small bowl, add all herb butter ingredients and use a fork to mix until combined. Wrap herb butter in a piece of plastic wrap and form into a ‘log’ about 3” long. Place in the freezer until firm, about 15 minutes. (Herb butter can be made in advance and refrigerated until use).

Preparing and Roasting the Chicken:

  1. Preheat oven to 450 degrees Fahrenheit. Make sure the cavity of the chicken is empty and pat the skin completely dry with clean paper towels or kitchen towels. Drizzle one tablespoon of olive oil in the bottom of a small roasting pan and place chicken in the pan.
  2. Stuff the cavity with sprigs of herbs, garlic cloves and quartered onion. Remove the herb butter from the fridge and slice the log into ‘coins’ about ¼” thick. Carefully lift the skin covering the breasts and slip the herb butter rounds under the skin, making sure to cover as much of the breast meat as possible. Make sure the skin covers all of the breast and butter.
  3. Rub the chicken with remaining tablespoon of olive oil and sprinkle with a pinch of salt and fresh ground pepper.
  4. Roast in the oven for 20 minutes at 450 degrees Fahrenheit. After 20 minutes, reduce the oven temperature to 350 degrees. Set a kitchen timer for 1 hour.
  5. After one hour, check on the chicken. Use a thermometer to test the internal temperature, at a thick part near the leg. It should read 170 degrees Fahrenheit when ready. If the chicken is not done, return to the oven and roast for another 10 to 15 minutes.
  6. Once the chicken has reached 170 degrees, remove from the roasting pan and set it on a carving board to rest.

To Make the Gravy:

  1. In a measuring cup, combine three tablespoons flour with one cup of chicken stock and whisk until smooth. Place the pan used to roast the chicken on a burner and bring the chicken juices to a simmer. Whisk in flour/stock mixture, add wine and cook until beginning to thicken, about 3 to 4 minutes. Season with salt and pepper to taste and strain the gravy through a sieve to remove lumps. Serve over carved chicken.

Bon Appétit and Enjoy!

Get updates from The Seasonal Gourmet on Facebook and Twitter.  Join the conversation today!

Copyright Trish Coleman. Please contact the author to obtain permission for republication. This recipe first appeared on Suite 101.com.


Slow Simmered Ragu with Pasta

12 01 2011

A Tuscan-style ragu, simmered slowly with herbs and wine, pairs perfectly with fresh pasta

We’re deep in the heart of winter and snow is blanketing much of North America (including areas that don’t normally get a lot of snow). It’s the kind of weather that makes you want to put something comforting on the stove to simmer while you curl up with a blanket and a good book.  A slow simmered Tuscan-style ragu sauce fits the bill perfectly.

A few years ago I was visiting Tuscany and happened upon an outdoor cooking demonstration. A chef and his mother, Mamma Donatella, were demonstrating how to make classic Tuscan dishes.  One of the dishes was fresh handmade pasta with a ragu sauce and Donatella’s version was unlike any I’ve had before: rich with flavour and light on tomato sauce.  Since then, I’ve worked on developing my own take on this Italian classic.  The secret is to let the sauce cook down for a long time (at least 2-1/2 to 3 hours).  You can make your own noodles or buy fresh pasta at many Italian markets. Good quality dry pasta will work as well – try wide noodles such as papardelle or tagliatelle.

Click here for the recipe on Suite 101: Slow Simmered Ragu with Pasta.

Bon Appétit and Stay Warm!

Get updates from The Seasonal Gourmet on Facebook and Twitter.  Join the conversation today!


Stuffed Pork Tenderloin Wrapped with Prosciutto

10 11 2010

Slices of stuffed pork tenderloin, served with risotto and garnished with fresh sage

Pork pairs very well with hearty herbs such as sage and thyme, making it the perfect choice for autumn dinners. Unfortunately, pork tenderloin is very lean and can tend to be dry if overcooked.  Stuffing it with a flavourful filling and wrapping it in thin slices of prosciutto will help keep it moist and delicious.

Preparing a pork tenderloin for stuffing is very easy:

  • Lay the tenderloin on a piece of plastic wrap on the counter. Using a sharp knife, slice lengthwise down the middle of the tenderloin, cutting about ¾ of the way through the meat (do not slice it entirely in half).
  • Open the slit as though opening a book. Make another similar slit down the middle of the left side and repeat again on the right. There will be three cuts down the loin in total.
  • Spread open the loin and place a piece of plastic wrap on top. Using a heavy meat mallet, pound the tenderloin until it is of uniform thickness, about 3/4“ thick. The pork is now ready to be stuffed and rolled.

A Helpful Tip: To secure the stuffed and rolled pork loin, break off a couple of pieces of raw dry spaghetti. Use the spaghetti like toothpicks to hold the meat in place. Insert into the meat and snap off any extra length that is poking out. The spaghetti will cook along with the pork and no one will notice it. It’s much safer than leaving toothpicks in!

Stuffed Pork Tenderloin Wrapped with Prosciutto

Serves 4 to 6

Stuffing:

  • 1 Tablespoon neutral oil such as canola or safflower
  • 1 small onion, finely diced
  • 1 clove garlic, finely minced
  • 3 slices white bread, crusts trimmed and cut into ½” cubes
  • ½ teaspoon finely chopped rosemary
  • ½ teaspoon finely chopped fresh thyme
  • 1 teaspoon finely chopped fresh sage
  • ¼ cup chicken stock
  • 1 Tablespoon white wine (optional)
  • 5 swiss chard leaves, chopped (about 1 cup of chopped chard)
  • 1 slice prosciutto, cut into small dice
  • ¼ cup (packed) shredded mozzarella or smoked mozzarella

Pork:

  • 1 lb. (450 grams) whole pork tenderloin
  • 4 to 5 slices prosciutto, sliced paper-thin
  • 1 piece dry spaghetti
  • 1-1/2 Tablespoons oil
  • 2 large pieces of plastic wrap
  1. Preheat oven to 425 degrees Fahrenheit.
  2. To make stuffing: In a large skillet, heat 1 Tablespoon of oil on medium-high heat. Add onion and garlic and sauté until they begin to soften, about 2 minutes. Add bread cubes and toast for 1 minute. Add herbs and cook for another minute.
  3. Pour in chicken stock and wine. Add swiss chard and cook until the chard goes limp, about 2 minutes. Stir mixture and continue to cook for a couple of minutes, until all liquid has been absorbed.
  4. Remove stuffing from the heat. Stir in diced prosciutto and mozzarella. Set mixture aside until ready to stuff the pork (stuffing can be made in advance and refrigerated up to 24 hours).
  5. To Prepare Pork: Slice open and pound out pork between sheets of plastic wrap as detailed above (‘Preparing a pork tenderloin for stuffing’).
  6. Lay the prepared pork flat and spoon the stuffing in a line down the middle. Roll up the tenderloin and secure with pieces of dry spaghetti (see ‘A Helpful Tip’, above) or toothpicks.
  7. Wrap the entire tenderloin with prosciutto slices. Pour 1-1/2 Tablespoons oil on the bottom of a baking sheet and place the tenderloin on the sheet.
  8. Roast pork for about 30 minutes or until the meat is just faintly pink when sliced into. Let cool slightly and slice. Serve with roast potatoes, rice or risotto. Garnish each serving with a sprig of fresh sage.

Bon Appétit and Enjoy!

This article first appeared on Suite 101.com.


Stuffed Butternut Squash

2 11 2010

Butternut squash can be stuffed to make an elegant vegetarian dish

My brother-in-law Dan is a vegetarian so I’m always trying to come up with interesting dishes so he’ll have something special to enjoy at Thanksgiving and Christmas.  I enjoy the challenge and it encourages those of us who eat meat to try some new dishes as well.  I made this butternut squash stuffed with wild rice and herbs last year and it was a hit.  It makes quite a bit so you should have plenty to serve as either a vegetarian main course or as a side dish.  It is delicious with pork, chicken or turkey. I can easily be adapted for vegans- just follow the substitutions at the end of the recipe.

Stuffed Butternut Squash

(VEGETARIAN)

Makes about 8 to 10 servings as a side dish or 4 to 6 servings as a main course

  • 1 medium butternut squash
  • 2 teaspoons neutral oil such as safflower

Stuffing:

  • ½ cup raw wild rice
  • ½ cup raw white rice
  • 2 cups vegetable stock
  • ½ medium onion, finely diced
  • ½ cup red pepper, finely diced (about ½ a large pepper)
  • 2 cloves garlic, finely minced
  • 2 Tablespoons finely chopped fresh sage leaves
  • ½ teaspoon finely chopped fresh rosemary
  • 1 teaspoon finely chopped fresh thyme
  • 2 Tablespoons melted butter OR margarine OR oil such as safflower or olive
  • Salt and pepper, to taste
  • ½ cup finely grated parmesan cheese
  1. Preheat oven to 425 degrees Fahrenheit.
  2. Using a large sharp knife, cut the butternut squash lengthwise down the middle and separate the two halves.
  3. Scoop out any seeds and discard. Rub each half of the squash with the oil (1 teaspoon per half). Place on a baking sheet and roast in the oven for 45 minutes or until tender. Check tenderness with a sharp knife – it should be soft enough to scoop out with ease.
  4. While the squash is roasting, prepare the stuffing ingredients. In a large saucepan, heat 2 cups vegetable stock until boiling. Add wild rice, cover tightly. Reduce the heat to medium and cook for 15 minutes. Add white rice to the pot and continue to cook the rice mixture for another 20 minutes or until the rice is tender and the stock has been absorbed.
  5. In a large bowl, add onion, red pepper, garlic, sage, rosemary and thyme. Once the rice mixture has cooked, add it as well.
  6. Remove baked squash from the oven and let cool slightly. Using a large spoon, carefully scoop the flesh out of the baked squash halves, making sure to leave about ¾” of a ‘wall’ intact so the shells will hold together. Add the scooped squash to the rice/stuffing bowl.
  7. Stir the cooked squash into the rice stuffing mixture until it is thoroughly combined. Add melted butter and salt and pepper to taste.
  8. Scoop the stuffing mixture back into the squash halves. Top each half with parmesan cheese or bread crumbs (1/4 cup per half).
  9. Bake stuffed squash for 20 minutes or until the cheese is beginning to brown on top. Garnish with a sprig of sage if desired.

*Vegan Adaptation:

Substitute vegan-friendly margarine, olive oil or neutral oil (canola, safflower, etc) for the melted butter. Top with ½ cup fresh breadcrumbs that have been tossed with 2 Tablespoons olive oil. Sprinkle with fresh chopped herbs. Bake stuffed squash for 20 minutes or until crumbs begin to brown.

Bon Appétit and Enjoy!

This recipe first appeared on Suite 101.com.

Stuffed Butternut Squash, garnish with a sprig of fresh sage


Butternut Squash Soup with Sage Brown Butter

21 10 2010

A butternut squash on the vine

Soups are one of my favourite things to make once the weather turns cool.  They are comforting and warming but best of all, easy to make (and most recipes are very forgiving).  They can also be made in advance which makes soups the perfect dish to serve as a starter at a dinner party or for a casual lunch.

Butternut squash is widely available at this time of year and it pairs beautifully with fresh sage.  A diced apple adds a touch of sweetness and brown butter is the perfect addition to drizzle over the finished soup.  Even though this soup seems hearty, it’s actually quite low in fat and can be easily adapted for vegetarians, making it a great choice for entertaining.

To learn more about making flavourful, lower-fat soups, check out this article I wrote for Suite 101.com: How to Make Flavourful Low Fat Soups.

Butternut Squash Soup with Sage Brown Butter

(Can be adapted to be VEGETARIAN)

Tip: Use a very sharp knife to peel and cut up the squash – they can be quite hard.

Makes 7 to 8 cups of soup

  • 2 teaspoons vegetable oil
  • 1 onion, chopped
  • 1 clove garlic, chopped
  • 1 teaspoon dried thyme
  • 1 Tablespoon chopped fresh sage
  • 1 teaspoon chopped fresh rosemary
  • 1 apple, peeled, cored and cut into cubes
  • 1 medium butternut squash, peeled and seeds removed and cut into 1″ cubes (about 3 cups of squash)
  • 6 cups low-sodium, fat-free chicken stock or vegetable stock (use vegetable stock if serving vegetarians)
  • Salt and pepper, to taste
  • Sage Brown Butter Garnish (see below)
  1. In a large pot, heat oil and add onion and garlic. Sauté until softened, about 5 minutes. Add herbs and cook for another 30 seconds.
  2. Add apple, butternut squash and stock. Cover and simmer on medium for 30 minutes.
  3. Let mixture cool and puree until smooth in a blender or with an immersion blender. Return to heat and simmer uncovered for another 15 minutes.
  4. Season soup with salt and pepper to taste and garnish each serving with sage butter.

Sage Brown Butter Garnish

  • 2 Tablespoons unsalted butter
  • 8 medium sized fresh sage leaves

In a small saucepan on medium heat, melt butter and add sage leaves. Cook until leaves are crisp and butter is beginning to brown. Garnish each serving of soup with a crispy sage leaf and a few drops of brown butter.


Butternut Squash Soup with Sage Brown Butter

This article first appeared on Suite 101.com.


Cheddar Herb Biscuits

30 09 2010

Freshly baked biscuits flecked with herbs and cheddar are the perfect accompaniment to a hearty bowl of soup

Now that fall has arrived and the weather has cooled, it’s soup season!  I love making soup and am always experimenting with different ingredients to come up with hearty versions that are a meal on their own (see below for links to my favourite soup recipes).  Of course, crackers or bread are classic accompaniments to a comforting bowl of soup but why not try something different by making some hot, fresh biscuits?

Some people are a bit intimated by working with biscuit dough but it’s not difficult if you follow a few guidelines. To make flaky and flavourful biscuits, here are a few tips:

  • Use cold, unsalted butter – don’t substitute margarine.
  • Don’t handle the dough too much.  This will make the biscuits tough and melt the butter, keeping them from puffing up during baking.
  • Use a wire pasty cutter (or two sharp knives) to cut the butter into the flour mixture.  The dough should look like small, coarse pebbles once the dough has been thoroughly mixed in.
  • Baking powder is the key ingredient to help the biscuits rise.  Make sure your powder is fresh and still active.
  • Buttermilk gives the biscuits a nice tangy flavour.  If you don’t have buttermilk, check out these Buttermilk Substitutes.  Regular milk is ok in a pinch but the biscuits won’t be quite the same.
  • Use old or extra old cheddar for the best flavour.
  • Cook the biscuits in a hot oven (450 degrees Fahrenheit) that has been adequately pre-heated.

Cheddar Herb Biscuits

Makes about 12 biscuits

  • 2-1/4 cups all-purpose flour, plus extra for dusting the countertop
  • 4 teaspoons baking powder
  • 1 teaspoon salt
  • 1 teaspoon sugar
  • 1 Tablespoon finely chopped fresh chives
  • 2 teaspoons very finely chopped fresh thyme leaves
  • 1 cup (packed) grated old cheddar cheese
  • 5 Tablespoons cold unsalted butter
  • 3/4 cup buttermilk
  • 1 large egg
  • 1 teaspoon dijon mustard
  1. Preheat the oven to 450 degrees Fahrenheit.
  2. In a large mixing bowl, add flour, baking powder, salt, sugar and chopped herbs. Stir with a fork until combined.
  3. Add the grated cheese and use your fingers to gently distribute it through the dough so it’s not all in one clump.
  4. Cut the butter into small pieces and add to the flour mixture.  Using a wire pastry cutter or two sharp knives, cut the butter into the dough until it looks like small pebbles.
  5. In a mug or glass measuring cup, add the buttermilk, egg and mustard and stir with a fork until smooth.  Pour into the flour mixture and gently mix together until the dough just holds together.
  6. Sprinkle some flour onto a clean countertop and turn out the dough onto the counter.  Use your hands to shape it so it just holds together.  Flatten the dough so it’s in a circle about 1″ thick.
  7. Use a cookie cutter or the top of a glass to cut out round biscuits (a 2-1/2″ circle is a good size).  Place the biscuits into a pie plate or baking dish so they are just touching one another.  Re-form any dough scraps and cut out the remainder of the biscuits.
  8. Let the biscuits rest in a warm place for 15 minutes.  Place the oven rack in the centre position and bake the biscuits for 15 minutes or until they are golden on top.
  9. Remove from the oven and let cool slightly before serving.

Here are a few of my favourite hearty autumn soups to go with the biscuits:

Beef, Barley and Mushroom

Peppery Leek and Potato

Curried Parsnip Soup

Corn Chowder with Bell Peppers

Cabbage Roll Soup

Chicken Noodle

Mushroom Soup

Seafood Chowder

Curried Parsnip Soup topped with a few cooked mussels

Bon Appétit and Enjoy!

Get updates for The Seasonal Gourmet on Twitter and Facebook.  Join the conversation today!


Stuffed Red Peppers

9 09 2010

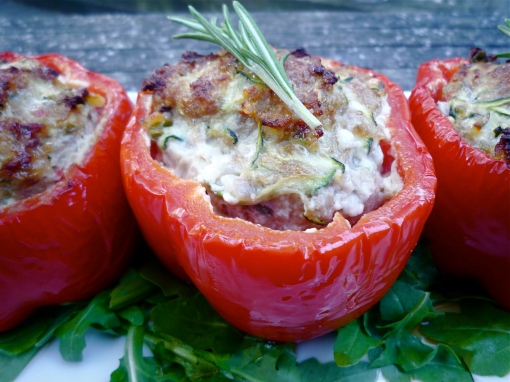
Stuffed red peppers make a hearty late summer meal

This week’s markets were awash in vivid colour as peppers hit their seasonal peak in Ontario.  I saw everything from mild poblanos to fiery hot habaneros but the most abundant were red bell and shepherd peppers.  Shepherd peppers are more elongated than bell peppers but they taste very similar and are basically interchangeable in recipes.

A red bell pepper growing in a garden near Picton, Ontario

Red peppers are just green peppers that have ripened.  However, once they turn red, the peppers become much sweeter, making them ideal for stuffing with meat, cheese, rice, grains or seafood.  This version was adapted from a recipe from an old issue of Bon Appétit magazine featuring the foods of Provence.  Stuffed vegetables are very popular in the South of France and are an excellent way to use up extra peppers or zucchini.

The recipe calls for slicing the peppers lengthwise in half and hollowing them out, however, they can also be stuffed by slicing off the top and filling the entire pepper.

A note to vegetarians: Check back soon for a meatless version!

Stuffed Red Peppers

Serves 4 to 6

  • 4 sweet or mild Italian sausages
  • 1 small zucchini (about 1-1/2″ in diameter and about 6″ long)
  • 1 small onion, minced
  • 1 clove garlic, finely minced
  • 1 teaspoon finely chopped fresh thyme
  • 1 teaspoon finely chopped fresh rosemary
  • 3/4 cup dry breadcrumbs
  • 1 large egg
  • 1/4 cup grated parmesan cheese
  • Salt and pepper, to taste
  • 4 large red bell or shepherd peppers
  • Rosemary sprigs to garnish (optional)
  1. Preheat the oven to 425 degrees Fahrenheit.
  2. Remove the casings from the sausages and place the meat in a large bowl (see Removing Sausage Casing for tips on how to do this efficiently).
  3. Trim the stem and end from the zucchini and grate it into the bowl using a box grater.  Add the onion, garlic, herbs, breadcrumbs, egg and parmesan to the bowl.
  4. Using your hands, work the ingredients into the sausage meat until the mixture is thoroughly combined.  Season with salt and pepper.
  5. Slice the red peppers lengthwise down the middle.  Trim out the stem and any seeds and ribs.
  6. Spoon the sausage mixture into each pepper half.  Place on a baking sheet or in a shallow pan and bake for 45 minutes or until the tops are beginning to brown. Garnish with rosemary sprigs if desired.

Bon Appétit and Enjoy!


Farmers’ Market Report – July 8th, 2010

8 07 2010

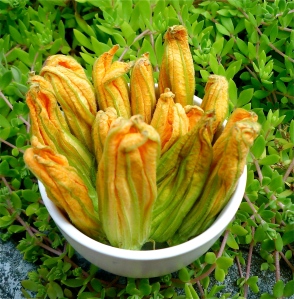
Zucchini blossoms are a rare and delicious summer treat.

Welcome to my first Farmers’ Market Report for Summer 2010!  The markets are at their peak for the next couple of months and this week’s offerings did not disappoint.  In fact, growing conditions in Southern Ontario have been so good this year, there were a few surprises.  Here is a rundown of some of this week’s highlights:

Corn

Corn has arrived at Ontario markets earlier than usual this year.

I was a bit stunned to see the first local corn at the markets already.  Speaking with some farmers, I learned that’s about two weeks earlier than normal this year.  I bought six ears to experiment with, crossing my fingers the quality was going to be decent. The ears were on the small side but the kernels were very tender.  It wasn’t as flavourful as I’d hoped but because it’s so early, I’m sure later harvests will be sweeter. My favourite way to eat corn is boiled, rolled in butter and then topped with salt and pepper. However, if you’re looking for something more elegant, try my recipe for Corn with Red Pepper and Herbs.

Peaches

Like corn, peaches are also early this year.  I didn’t buy any this week but we’ve been having a heat wave so hopefully that bodes well for upcoming weeks (peaches love hot, dry weather).  Peach Tiramisu is an elegant, no-bake dessert that showcases fresh peaches beautifully.

Apricots

Apricots were abundant at this week's market.

I often find raw apricots kind of bland with a bit of a mealy texture but the ones I bought today were pretty tasty.  They had a nice sweet-tartness to them so I ate a few out of hand.  I chose ones on the smaller side but the farmers were selling larger ones as well.  Apricots are ideal for both sweet and savoury recipes; why not make some Spicy Apricot Glazed Grilled Shrimp?

Herbs

Fresh herbs were in abundance this week including basil, mint and dill.  I keep an herb pot during the summer for day-to-day herbs but if I decide to do any large batch pickling or pesto, I’ll head to the farmer’s market to buy large amounts at a good price. To make use of summer herbs, check out my recipes for Pesto Sauce and White Bean Dip with Fresh Herbs.

Summer Squash

Pattypan squash and baby zucchini.

I have a feeling that zucchini are going to take over many gardens this summer, judging by the number and size of them at this week’s market.  Many of the yellow and green zucchini on display were already getting a little big for my taste (smaller ones tend to be less watery and are better for most recipes).  Pattypan squash were also abundant this week. You can make the most of summer squash by making Zucchini Pie with Fresh Basil or a moist Zucchini Bread with Cream Cheese Frosting.  I was also excited to find zucchini blossoms at a local grocer this week.  They are fragile and rare but will occasionally turn up at local markets.  To use them, try my recipes for Stuffed Zucchini Blossoms.

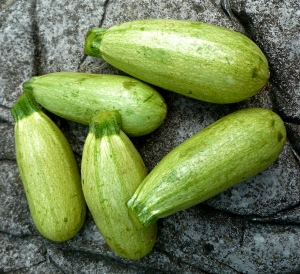
I discovered another summer squash this week that I was not familiar with: vegetable marrow (see photo below).  I asked the farmer about them and learned that they are very similar to zucchini and are often stuffed with a ground meat mixture.  It seems to be a popular vegetable in England.  You can find a recipe for stuffed vegetable marrow here: Recipe for Stuffed Marrow with Sausage Meat.

Vegetable marrow are similar to zucchini and are delicious stuffed.

Cucumbers

My husband loves cucumbers and often eats sliced cukes with a dash of salt and pepper as a snack.  They also add a fresh note to sandwiches and salads.  A crisp Asian Summer Slaw makes a great no-cook dinner.  Some of the stalls were selling dill alongside baby cucumbers – one-stop shopping for pickle makers.  Pick up some smoked salmon to make a Smoked Salmon and Cucumber Salad that is accented with fresh dill.

Cherries

Both sweet and sour Ontario cherries were abundant this week.  While sweet cherries are imported from the U.S. each spring, sour ones are harder to find.  My grandmother had a sour cherry tree in her yard so they were the only kind we ever had when I was growing up.  They’re not very good raw but once cooked and sweetened, they have a tartness that is addictive.  For a classic sour cherry pie recipe, check out this one from Epicurious.com: Classic Sour Cherry Pie with Lattice Crust.  If you have sweet cherries, why not make a Cherry Clafouti with Almonds or a simple Cherry Almond Bread?

Asparagus

I was told that this is probably the last week for asparagus this year.  Usually by the end of the season, asparagus is starting to look tired but not this year.  The stalks were thick, robust and vibrant.  This was an exceptional year for asparagus and I enjoyed it in a variety of dishes.  Check out the Asparagus Archives for some delicious ideas ranging from Sesame Noodles with Asparagus and Mushrooms to a rich and decadent Roasted Asparagus Lasagna.

Until next week,

Bon Appétit and Enjoy!


Stuffed Pork Tenderloin Wrapped with Prosciutto

8 11 2009
P1010163

Stuffed Pork Tenderloin Wrapped with Prosciutto

Pork is the perfect autumn dinner – it pairs well with seasonal herbs such as sage and thyme and it’s robust enough for cooler weather.  It’s also incredibly versatile and can be enjoyed as ham, bacon, chops, ground, pulled or roasted.  Tenderloins are available at any supermarket or butcher and are small enough to cook quickly. Unfortunately, they can also be a bit dry and boring. By stuffing it with a savoury mix of bread cubes, herbs, swiss chard, diced prosciutto and mozzarella, I’ve made a basic loin a little more interesting.  Wrapping it in prosciutto helps keep the meat moist and adds extra flavour.  Serve with orzo, rice, risotto or roasted potatoes.

To get the recipe, check out a recent article I wrote for Suite 101.com: Stuffed Pork Tenderloin Wrapped with Prosciutto.

Bon Appétit and Enjoy!