Souvlaki, Tzatziki Sauce and Greek Style Salad

28 07 2008

I was at a Farmer’s Market Saturday and picked up some beautiful red peppers, garlic, cucumbers and early field tomatoes.  While trying to decide what to make for dinner last night, I realized that I had the beginings of a Greek-style dinner.  I have some fresh oregano growing in my herb garden so I only needed a few additional ingredients to put together a light, refreshing dinner that can be made on the grill, which is ideal for keeping the kitchen cool on a hot summer day.   I usually make my souvlaki with chicken breasts but you could easily substitute pork, shrimp or even firm tofu.  There are a number of steps but everything can be done in advance.

Souvlaki

Serves 4

(Can be adapted to be VEGETARIAN)

Marinade:

  • 2 Tablespoons olive oil
  • Juice from 1 lemon (seeds removed), approximately 1/3 cup juice
  • 1 teaspoon finely chopped fresh oregano
  • 1/2 teaspoon salt
  • 1/2 clove garlic, finely minced
  • Generous amount of freshly ground black pepper

For skewers:

  • 4 boneless, skinless chicken breasts (or subsitute shrimp, pork or firm tofu), cut into 2″ cubes
  • Skewers – metal or bamboo  (if using bamboo skewers, soak them in water for approximately 20 minutes prior to using so they don’t burn on the grill)
  • 1 small green pepper, seeded and cut into 1″ cubes
  • 1 small red pepper, seed and cut into 1″ cubes
  • 1 small red onion, skin removed, cut into 1″ cubes
  1. In a large bowl combine all ingredients.  Toss meat (or tofu) so it is coated in marinade.  Cover and refrigerate for at least 1 hour.
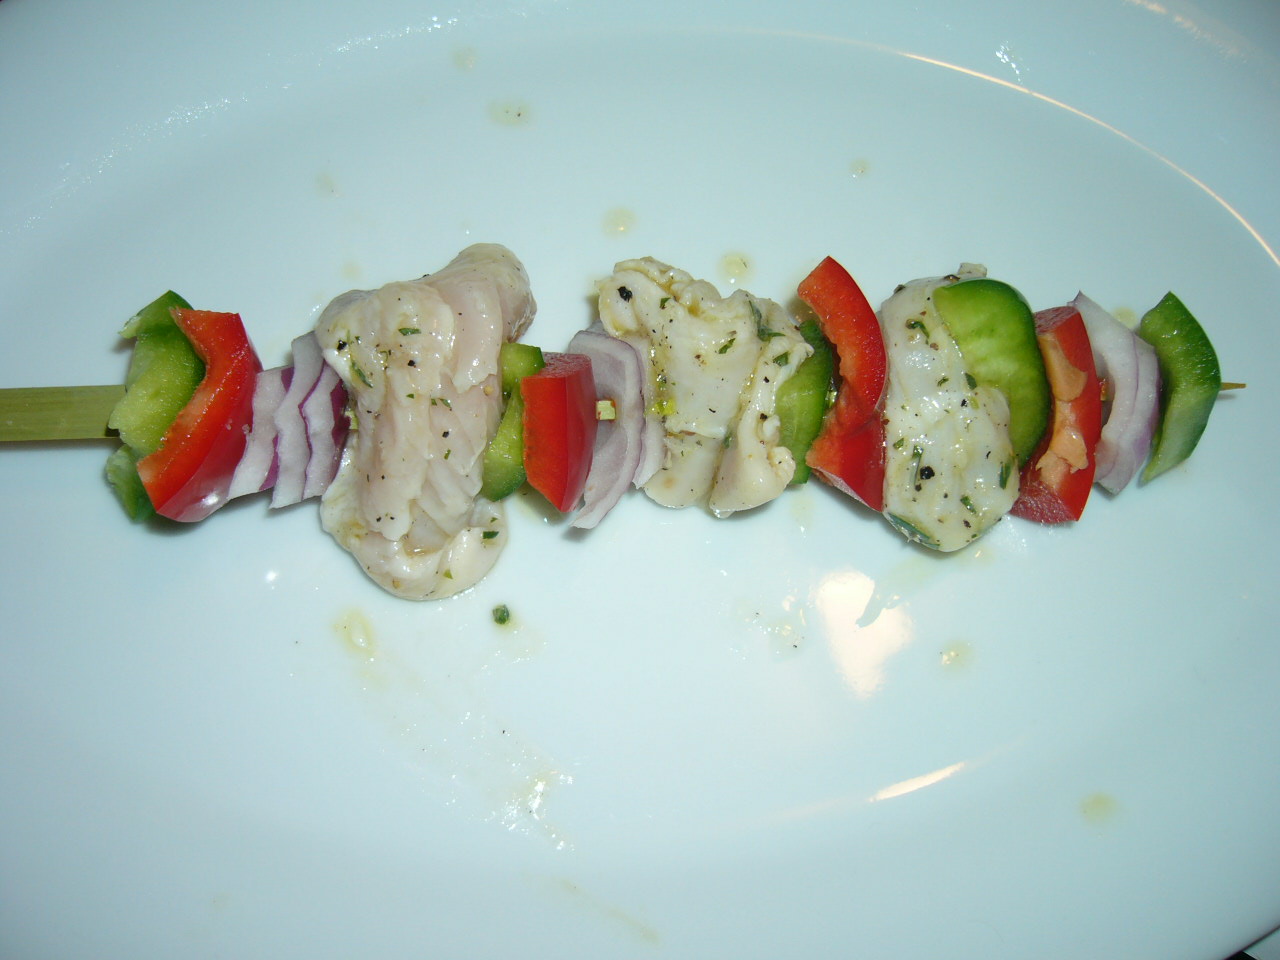
  2. To assemble skewers, alternate putting the following ingredients onto the skewers: one piece of green pepper, one piece of red pepper, one piece of onion, one piece of chicken.   Like this:
  3. Helpful Tip: I try to buy flat bamboo skewers so the meat and vegetables don’t spin around the skewer when I turn them over on the grill.  If you can’t find flat ones, you can use two skewers so your souvlaki will stay in place.
  4. Repeat until all chicken is used up (there may be additional vegetables left over, you can do a couple of veggie skewers to use up the pieces.  Brush with marinade before grilling).
  5. Light your grill (alternately, skewers can be cooked under your oven’s broiler or on an indoor grill).  Once the grill is hot, cook skewers until browned on one side and turn over, approximately 7 minutes per side, depending on how hot your grill is.   Continue cooking until meat is cooked through.
  6. Remove from grill.  Serve with tzatziki sauce, salad (recipes follow) and grilled pita bread.

Tzatziki Sauce

Makes approximately 1 cup of sauce

(VEGETARIAN)

Note: the yogurt needs to drain for at least 5 to 6 hours before mixing with the garlic, cucumber and dill.

  • 1 cup plain yogurt (not low-fat)
  • Cheesecloth
  • 2 cloves garlic, finely minced  (for garlic lovers – reduce to one clove for a milder sauce!)
  • 1/2 cucumber, peeled, seeded and cut into 1/2″ dice
  • 1 Tablespoon fresh dill, finely chopped
  • Salt, to taste
  1. Line a strainer with cheesecloth (double thickness).  Spoon the yogurt into the cloth.  Cover with plastic wrap, place strainer over a bowl and refrigerate for 5 to 6 hours or overnight.   Liquid will drain from the yogurt, making it thick and cheese-like.
  2. When ready to use, discard the water that has collected in the bowl.  In a medium mixing bowl, mix together the thick yogurt, cucumber, dill, garlic and salt.
  3. Cover and refrigerate until ready to use. 


Greek Style Salad

(VEGETARIAN)

Dressing:

  • 1 teaspoon finely chopped fresh oregano
  • 1/2 clove garlic, finely minced
  • 3 Tablespoons olive oil
  • pinch of salt
  • 1 teaspoon white wine vinegar
  • 2 teaspoons lemon juice
  • 1/2 teaspoon dijon mustard
  • Fresh ground black pepper, to taste
  1. Combine all ingredients and whisk until blended

Salad:

  • 2 cups (packed) mixed salad greens
  • 1/2 cucumber, cut into chunks
  • 1/4 red onion, peeled and cut into thin rings
  • 1/2 red pepper, cut into thin strips
  • 1/2 green pepper, cut into thin strips
  • 12 grape or cocktail tomatoes, cut in half
  • 3/4 cup (4-1/2 oz. or 125 g) crumbled feta cheese
  • Handful of black olives (optional)
  1. In a large salad bowl, add all ingredients and toss to mix.  Add dressing to coat salad greens and toss.  Serve with souvlaki kebabs.

Bon Appetit and Enjoy!


Cherry Almond Bread

25 07 2008

cherries

Last summer my husband Allan and I stayed at a beautifully restored villa near Cortona, Italy in the Tuscan countryside.  It was called Villa di Piazzano and the buildings and surrounding views were exactly how I envisioned Tuscany after reading Frances Mayes’s memoir ‘Under the Tuscan Sun’.   We stayed in the Luna Piena room (‘Full Moon’) and one night we slept with the window open so we could feel the cool evening breeze and enjoy the silence of the countryside (we live in the city so it was a welcome break!).  In the morning, the smell of baking from the kitchen below us woke me up.  When we went down to breakfast, there was a table full of local sheep’s cheeses, Tuscan fennel salami, juices and fantastic baked goods such as sweet breads and pastries.  I developed this Cherry Almond Bread so we could enjoy a similar type of breakfast on occasion.    The recipe calls for sweet cherries instead of sour ones – the sweet ones are usually a very dark reddish-burgundy.

The view from the Luna Piena room at Villa di Piazzano, Cortona, Italy


Cherry Almond Bread

(VEGETARIAN)

A note about pitting cherries: There are various methods you can use to pit cherries including buying a cherry/olive pitter.  Some people swear by using a chopstick to poke the pit through the cherry while others use the tip of a knife to dislodge it.  Because this recipe does not call for a lot of cherries, I simply cut around the middle of the cherry from top to bottom (cutting through the diametre until you hit the pit) and gently pull apart the two halves, using the tip of the knife to remove the pit.   This will minimize the mess and give you two nice halves.

  • 1-1/2 cups + 2 Tablespoons all purpose flour
  • 1/4 teaspoon salt
  • 3/4 cup sugar
  • 1-1/2 teaspoons baking powder
  • 1/2 teaspoon baking soda
  • 2 eggs
  • 2/3 cup neutral oil (such as safflower or canola)
  • 1/2 cup sour cream
  • 1/2 teaspoon vanilla extract
  • 1 teaspoon almond extract
  • 1 full cup (rounded) pitted, halved sweet cherries (see note at top for pitting advice)

Topping:

  • 1/4 cup slivered almonds
  • 1-1/2 teaspoons sugar
  1. Preheat oven to 375 degrees Farenheit.  Grease a standard size loaf pan and set aside.
  2. In a small bowl, combine the cherry halves and 2 Tablespoons of flour.  Toss to coat the cherries and set aside.
  3. In a large mixing bowl, combine 1-1/2 cups flour, the salt, sugar, baking powder and baking soda.  Stir to combine.
  4. Add the eggs, oil, sour cream, vanilla and almond extracts to dry ingredients.  Stir until just combined (the mixture will be quite thick). 
  5. Gently fold cherries into batter, stirring carefully to mix.  Spoon into greased loaf pan.  Top with slivered almonds and sugar.
  6. Bake for approximately 35 to 40 minutes, or until a knife inserted in the middle comes out clean.  Let cool, remove from pan and cut into slices.

Bon Appétit and Enjoy!

cherry-almond-bread


Coming Soon…

25 07 2008

It’s been a pretty busy summer for The Seasonal Gourmet and unfortunately my computer has been causing technical difficulties which left me out of commission for a couple of weeks.  However, I’m testing new recipes with the great produce that’s now in season and just returned from two fantastic weeks in Spain.  I’ll be reporting soon on my amazing gastronomic adventures in Barcelona and San Sebastian and developing some new recipes based on the cuisines of the Catalan and Basque regions.  I’m also working to improve my photos (and will hopefully get a new, more reliable computer soon!) so I can post more regularly.  Stay tuned and check back soon for updates!


Delicious jamon iberico and Spanish cheeses at La Boqueria in Barcelona, Spain


Ricotta Gnocchi with Basil Pesto

29 06 2008

Gnocchi w pesto

For years I could not figure out the appeal of gnocchi.  The small Italian dumplings can easily be found on restaurant menus and at the supermarket but the few times I dared try it, I found it heavy and gummy so I typically avoided ordering it.  Then one day I ordered a small bowl as a primi at an Italian resto and realized how good it can be.  The light, airy dumplings were bathed in a fresh tomato sauce – it was a revelation.  I did some research and discovered that gnocchi are actually very easy to make.   They are most often made with potato, however, I make a version with ricotta cheese that is very quick and simple to prepare.  It makes an impressive starter or main dish for a summer meal.  You can serve it with the fresh basil pesto that follows or top with your favourite sauce.

Ricotta Gnocchi

Serves 2 as a main dish or 3 to 4 as a starter (primi) course

(VEGETARIAN)

  • 1 cup ricotta cheese
  • 1 to 2 cups unbleached all-purpose flour, plus additional for flouring countertop (amount of flour needed will depend on how wet your ricotta is)
  • 1 egg
  • 1/2 teaspoon salt
  • 2 Tablespoons olive oil
  1. In a large mixing bowl, combine ricotta, 1 cup flour, salt and egg.  Mix until combined.
  2. Check texture of the dough.  If it is sticky and wet, add additional flour 1/4 cup at a time.  Mix into dough and re-check.  Continue adding flour a little at a time until you reach the desired consistency. Dough should be moist and pliable but not sticky.
  3. Once the dough is the correct consistency, sprinkle about 1/4 cup flour onto a clean countertop.  Scoop out about 1/4 cup of dough onto counter and roll it into a long ‘snake’, about 1/2″ in diameter.  Like this:
  4. Flatten the dough slightly with a fork, leaving groove marks in the dough.  Cut into pieces approximately 1″ long.  Set gnocchi aside on a plate.  Repeat the process with the remainder of the dough.
  5. Fill a large stock pot with water and add 1 Tablespoon of salt.  Bring to a boil.  Add gnocchi and cook until the dumplings float to the surface, approximately 1 to 2 minutes. 
  6. Drain cooked gnocchi into a colander and run under cold water to stop them from cooking further.  (If you are not serving the gnocchi immediately,  you can toss them with a tablespoon of olive oil and refrigerate until ready to proceed with the next step).
  7. Heat 2 Tablespoons olive oil in a large skillet.  Add gnocchi and saute until browned on one side.  Turn them over and brown the other side.  Remove from pan and toss with your favourite sauce (see suggestion below).

Fresh Basil Pesto

Pesto originated in the city of Genoa, Italy.  Traditionally, it is made with pine nuts, however I tend to prefer it without the nuts.  You can always throw in a tablespoon of toasted pine nuts if you’d prefer. 

(VEGETARIAN)

  • 1 cup (packed) fresh basil leaves, stems removed
  • 4 Tablespoons olive oil
  • 1 clove garlic, roughly chopped
  • salt, to taste
  • 1/4 cup freshly grated parmesan cheese, plus additional for grating on top
  1. In a food processor*, add all ingredients and pulse until combined and a thick sauce forms.  Toss with your favourite gnocchi or pasta and grate additional parmesan on top. 

*If you do not have a food processor, you can use the traditional method of mashing the ingredients with a mortar and pestle.  I usually use a Cuisinart hand blender with the ‘processor’ cup attachement instead of a full sized food processor. 

Bon Appetit & Enjoy!


Fresh and Simple Inspiration – June 17th, 2008

17 06 2008

As we enjoy the last few days of spring,  here are a few simple ideas you can try with what’s in season right now:

Why don’t you…

-Serve fresh cut-up strawberries mixed with a little sugar (a tablespoon or so) over your favourite ice cream?

-Slice some strawberries to top your favourite cereal?

-Toss some fresh asparagus (trim off woody ends) with a couple of teaspoons of olive oil and roast in the oven (@ 425 degrees for approximately 15 minutes)?  To serve, finish with some salt and pepper and a squeeze of fresh lemon juice.

-Stir-fry some cut up asparagus in a little bit of oil, a dash of soy sauce, some minced garlic and a spoonful of sesame oil?  Sprinkle with some toasted sesame seeds and serve with your favourite grilled teriyaki meats and some rice.

-Enjoy a nice crisp glass of champagne or sparkling wine with a bowl of fresh ripe strawberries?   It’s a classic pairing.

-Slice some fresh basil leaves into slivers and toss with chunks of fresh mozzarella and a drizzle of good quality balsamic vinegar?  Sprinkle with salt and pepper to taste.

 Bon Appetit & Enjoy!


Quick Strawberry Jam and Easy Drop Biscuits

15 06 2008

I love a good berry jam or jelly.  My mother used to always make big batches of strawberry jam and raspberry jelly when the berries were in season to keep through the winter.  It was an annual ritual for previous generations.  Unfortunately, canning large quantities can be time consuming so a lot of people don’t do it anymore.   I’ve been making do with jams I find at various shops or markets but it occured to me that it’s actually pretty easy to make small batches for immediate consumption (I do not include instructions for canning large quantities but you can easily find information if you’re interested in doing so.  See http://www.pickyourown.org/jam.htm).  Now that strawberries are in season, what could be better than fresh jam and hot biscuits? 


Quick Strawberry Jam

I don’t put very much sugar in mine as I like the fresh taste of the berries to shine through.  However, if you prefer a sweeter jam, adjust sugar to taste.

Makes about 2 cups of jam

  • 2 cups fresh strawberries, hulled and halved
  • 1 cup granulated sugar (or to taste)
  • 1/4 cup water
  • 1 package (57 g / 2 oz.) powdered pectin – I use Certo brand in a red box
  1. Place berries, sugar and water in a large saucepan.  Heat berries on medium-high until mixture begins to simmer and the berries are begining to cook down (approx. 7 minutes). 
  2. Using a potato masher, lightly mash berries.
  3. Reduce heat to medium and add pectin.  Cook on a gentle simmer until it begins to thicken, approximately 30 minutes.
  4. Stir mixture and bring to a boil for approximately 5 minutes.  Keep stirring it so it doesn’t burn on the bottom.
  5. Spoon jam into a small bowl and refrigerate until ready to use.  It will get thicker as it cools.  It will keep covered in the fridge for a few days.  Serve on toast or with fresh baked drop biscuits (recipe follows).


Easy Drop Biscuits

These biscuits are very easy – no rolling required.  They are best eaten hot out of the oven with butter or jam.

Makes 6 biscuits

(VEGETARIAN)

  • 1-1/2 cups all purpose flour
  • 1 Tablespoon sugar
  • 2 teaspoons baking powder
  • 1/2 teaspoon salt
  • 1/2 teaspoon baking soda
  • 6 Tbsp (3/4 of a stick or 1/8 + 1/4 cup) unsalted butter, plus extra for greasing baking sheet
  • 1 cup milk (low fat is ok)
  1. Preheat oven to 425 degrees Fahrenheit.  Grease a cookie sheet with butter and set aside.
  2. In a large bowl, stir together flour, sugar, baking powder, salt and baking soda until combined.
  3. Cut butter into small pieces and add to dry mixture.  Using a wire pastry cutter*, cut butter into small pieces until the mixture looks like coarse crumbs.  See photo:
  4. Add milk and stir into mixture until combined – dough mix will be quite wet.  Using a 1/4 cup measuring cup,  scoop up a large spoonful of dough mixture and drop onto cookie sheet.   Repeat to make six biscuits.
  5. Bake until golden brown on top, approximately 15 minutes.  Enjoy hot out of the oven with fresh jam.

*If you do not have a pastry cutter, you can use two sharp knives to cut the butter into the dough.

Bon Appetit & Enjoy!


Tastes of New Brunswick

11 06 2008

I recently returned to my hometown of Quispamsis, New Brunswick to visit family.  It was the perfect opportunity to explore what the province has to offer for culinary delights.  I grew up in New Brunswick but this was an excellent chance to find out what is new on the scene as well as re-visit old favourites such as lobster and traditional Maritime home cooking.

There have been some very positive developments on New Brunswick’s culinary front.  Wineries are starting to sprout up across the province and artisanal cheese makers are producing delicious cow and sheep’s milk cheeses.   A few restauranteurs are moving beyond the usual fish and chips and are developing creative menus that showcase the best of local, seasonal products.  Here are a few highlights of my trip:


The Rossmount Inn, St. Andrews-by-the-Sea

I had heard positive reviews of the food at the Rossmount Inn in St. Andrews so I was excited to have the opportunity to dine there with my parents.  Luckily it did not disappoint.  The dining room at the inn is warm and welcoming and the service friendly and efficient.  The menu is based on local, seasonal ingredients and is updated frequently.  The three of us sampled a range of items from the creative menu.  Some highlights included a fiddlehead-asparagus bisque with a fantastic curry-hemp oil drizzle, a candied beet salad with shaved fennel and a moist pancetta-sage wrapped pork tenderloin.  The dessert menu had a number of tempting treats but I couldn’t resist ordering ‘Breakfast for Dessert’: vanilla french toast with blueberry syrup, cinnamon crisp and maple-bacon ice cream.  The secret to eating it is to taste all of the elements together so you get a hit of sweet, creamy and a bit of smokiness all at once.  It tasted just like – breakfast for dessert!  It was refreshing to see something so creative on a menu and an interesting change from the old standbys.  Of course for those who enjoy the classics, the swiss chocolate truffle cake was perfectly executed.  We also had a beautiful cheese plate to finish, featuring New Brunswick cheeses (more on that later!).  You can visit www.rossmountinn.com for further information on the inn and restaurant.

Kingston Farmer’s Market

The Kingston Farmer’s Market is held each Saturday morning on the Kingston Penninsula.  I wasn’t sure what to expect but was pleasantly surprised at the variety of foods available.  There is a traditional breakfast available but a number of stands were cooking up specialties from places as diverse as India, Germany and Jamaica.  There was even a stand with Kurdish food.  The more traditional New Brunswick favourites were also there, including maple syrup, local honey and homemade jams and relishes.  There wasn’t very much local produce available because the growing season has just begun but as summer progresses farmers will start bringing their fruits and vegetables.   Visit www.kingstonfarmersmarket.ca for more detailed information.

Local Products

Some of the best food you can eat in New Brunswick is in people’s homes.  Luckily for home cooks, there are an abundance of excellent local products to work with.  We ordered some lobsters from Misty Harbour Seafood (http://www.mistyharbourseafood.com) and they were fantastic!  Each lobster was at least 2-1/2 to 3 lbs, with the largest weighing in at close to 3-1/2 lbs.  The meat was sweet and succulent and we ate them out of the shell with melted butter for dipping.  Simple and delicious.  There was enough left over to use the next day for lobster rolls or for a quiche or seafood pot pie.   You can purchase them live to cook at home or pre-order them cooked for you.  We also picked up some scallops and pan fried them simply in butter with a light dusting of flour, salt and pepper.  They tasted exactly how good scallops should: sweet, firm and fresh.  Divine!


 Note that the giant claw is sitting on a standard 13″ dinner plate!

Despite our delicious seafood feasts, sometimes you feel like having some decent meat or poultry.  We paid a visit to Kuinshoeve Meat Ltd. (www.kuinshoeve.ca) in the Kennebecasis Valley.  They specialize in New Brunswick raised, hormone-free meat and chicken.   We tried the veal rib chops and a free-range chicken.  The chicken weighed in at close to eight pounds – more like a small turkey!  We grilled the veal and it was tender and juicy.  The chicken was oven roasted with some herbs, lemon and garlic and the roasted meat was moist and delicious with a crispy, bronzed skin.    

Perhaps my favourite culinary discovery in New Brunswick was the locally produced artisan cheeses we had at the Rossmount Inn.   La Bergerie aux 4 Vents in Sainte-Marie-de-Kent (near Moncton) is producing some top quality raw milk cow and sheep’s cheeses.  We sampled three: Le Gamin, Le Sieur de Duplessis and Tomme le Champ Dore.  Le Sieur de Duplessis and the Tomme le Champ Dore are both sheep’s milk cheeses and Le Gamin is made from cow’s milk in the style of an Italian taleggio.  Unfortunately, we had trouble finding these products in the store or Saint John City Market.  However, they are sometimes available at cheese shops in Toronto, including Alex Farms, The Cheese Boutique and The Art of Cheese.  They are definitely worth seeking out.   At the moment, La Bergerie aux 4 Vents does not appear to have a website.  There was an article in The Globe and Mail on June 18th about Le Sieur de Duplessis – you can read it at: http://www.theglobeandmail.com/servlet/story/RTGAM.20080618.wlcheese18/BNStory/lifeFoodWine/home

Overall, I had a great visit with my family and a lot of great meals!  For more information about New Brunswick food and travel, check out www.new-brunswick.net/new-brunswick/recipes.html


Asparagus Soup

1 06 2008

Asparagus is without a doubt one of my favourite vegetables.  So you can imagine how pleased I am that we’re in the heart of asparagus season and locally grown stalks are available everywhere.   They make an excellent accompaniment to grilled or roasted meats, as the basis for a salad or stir fry or are delicious just on their own!  To get the asparagus season started, here is a simple asparagus soup that makes a nice lunch with a light sandwich or is great way to begin a spring-inspired dinner.

Asparagus Soup

Makes four 1-cup servings

(Can be made VEGETARIAN)

  • 1 Tablespoon neutral oil, such as safflower or canola
  • 3 leeks
  • 1 clove of garlic, peeled and roughly chopped
  • 1 bunch (approx. 12 oz or 2 cups chopped) asparagus, woody ends discarded and cut into 1″ pieces
  • 1 medium russet potato, peeled and cut into 1/2″ dice
  • 3 cups chicken OR vegetable stock (homemade or canned, try to use low-sodium stock)
  • 1/2 cup half-and-half (see ‘Helpful Tips’ at the bottom for further suggestions)
  • Salt & pepper, to taste
  1. Place leeks on a cutting board.  Cut off and discard green leaves and root ends, leaving just the white bulbs.  Slice the bulbs lengthwise down the middle.  Rinse well under running water, making sure to clean out all the layers.  Return to cutting board and lay the flat side down.  Cut into ‘rings’, approximately 3/4″ thick.
  2. In a large saucepan, heat oil on medium-high.  Add leeks and garlic and saute until the leeks are soft and just begining to brown, approximately 4 minutes (be careful they don’t start to burn!)
  3. Add asparagus pieces, potato and stock to pot.  Cover and simmer on medium heat until asparagus and potatoes are tender, approximately 15 minutes.
  4. Once vegetables are tender, remove from heat and reserve a few of the tips for garnish.  Carefully puree vegetable mixture with an immersable hand blender or in a blender until smooth.
  5. Return puree to saucpan and add half-and-half.  Season with salt and pepper to taste.  Garnish servings with reserved asparagus tips.

Helpful Tips:

  • The soup can be made in advance and re-heated for service, making an excellent starter course for a spring dinner party
  • Be careful not to overcook the asparagus – it will start to become an unappetizing colour!
  • When pureeing soup, be careful not to fill the blender too full.  You may have to puree the soup in batches
  • As a healthier alternative, you can substitute low-fat canned evaporated milk for the half-and-half.  It won’t be quite as good though!  Or, you could make it extra decadent by using whipping cream (35%) to produce a rich, silky soup.

Asparagus Soup


Spring Cocktails

1 06 2008

Springtime typically brings a number of occasions for celebration – graduations, Mother’s Day, Father’s Day, wedding showers, birthdays, etc.  What better way to toast your special occasion than with a cocktail inspired by the blossoming season?  Even if that occasion is just a Friday night with your friends!

A number of cocktails are made with a simple syrup (water and dissolved sugar) or sour mix as an ingredient.  I’ve taken that idea and developed a syrup made from fresh strawberries and rhubarb.  It’s both sweet and tart and provides a refreshing change from the usual cranberry juice mix. 

Strawberry-Rhubarb Syrup

Yields approximately 1 cup

(VEGETARIAN FRIENDLY)

  • 2 stalks rhubarb, diced (approx.  1-1/4 cup)
  • 1-1/2 cups fresh strawberries, hulled and halved
  • 1 cup water
  • 1/2 cup sugar
  • 1/4 teaspoon vanilla extract
  1. Combine ingredients in a saucepan and bring to a boil.  Lower heat to medium-low and cover pot.
  2. Simmer on medium-low heat until fruit is softened, approximately 3 minutes.
  3. Mash cooked fruit with a potato masher until all solids resemble puree.  Place a mesh strainer over a large bowl and carefully pour fruit mixture into strainer.
  4. Stir the mixture in the strainer with a spoon until the liquid has all strained through leaving just pulp (it can take a while because the puree is quite thick).   Discard fruit solids.
  5. Return the liquid from the bowl to the saucepot and simmer on medium heat until it’s reduced by about half.   Remove from heat and cool.  Refrigerate until ready to use.

Canadian 75

Makes 1 drink

(VEGETARIAN)

This is a variation on a classic cocktail called a French 75.  The original is made with simple syrup but the strawberry-rhubarb syrup adds a new dimension of flavour.  The night my husband proposed we were drinking French 75 cocktails so it is a drink that always makes me smile.  Don’t use expensive champagne for this – an inexpensive, dry sparkling wine will suffice.

  • 1 oz. gin
  • 1 oz strawberry-rhubarb syrup (see recipe above)
  • 1 oz fresh lemon juice
  • Dry sparkling wine

Combine gin, syrup, and lemon in a champagne flute.  Top with sparkling wine.


Le Printemps

Makes 1 drink

(VEGETARIAN)

This martini-style cocktail is a refreshing alternative to the Cosmopolitan craze that has swept the drink scene over the past few years. 

  • 1 oz vodka
  • 1/4 cup strawberry-rhubarb syrup (see recipe above)
  • 5 – 6 ice cubes
  • Dry sparkling wine
  1. In a cocktail shaker, combine vodka, strawberry-rhubarb syrup and ice.  Shake well until combined.
  2. Strain into a martini glass and top with sparkling wine.  Garnish with a strawberry slice.


Springtime Kir

Makes 1 drink

(VEGETARIAN)

Kir Royale is an apertif often enjoyed before meals in France.  It’s made with cassis and champagne.  This is a new alternative to the classic drink.

  • 1/2 oz strawberry-rhubarb syrup
  • Dry sparkling wine

Pour strawberry-rhubarb syrup into the bottom of a champagne flute.  Top with sparkling wine.

Bon Appetit and Enjoy!


Why Eat Seasonally?

29 05 2008

Walk into any supermarket today and you can find a vast array of produce from around the world.  While this gives us a huge variety from which to choose, it can also lead to inferior tasting produce arriving in stores thousands of miles from where it was grown.   When you eat food that has been grown locally in its proper season, the difference in taste is astounding: food actually tastes the way it’s supposed to!  You cannot compare the flavour of an imported strawberry in January to one that was grown locally in June.   The pure deliciousness of in-season fruits and vegetables means that as a cook, your job becomes much easier.  In the spring, for example, fresh steamed asparagus with a pat of butter and some salt and pepper makes a delicious side dish with minimal effort. 

There is also an economic factor – food grown locally in its season is generally less expensive than imported produce.   In addition, with the recent focus on environmental issues, locally grown means less transportation and therefore less fuel consumption. 

I’ll be the first to admit that for years I did not take much notice of what was in season throughout the year.  If I felt like having asparagus in December I thought, ‘why not?  They have it at the store’.  Of course it’s imported from Peru and costs dearly but you can get it.  Since I’ve started paying attention to when produce is at its peak, I’ve eaten much better.  Sometimes it reaches the point of ridiculous: I ate so many peaches during the brief peach season last summer that I ALMOST got sick of them!  They were truly divine – plump, juicy and bursting with flavour.  Once you’ve had them at their best, you’ll never be satisfied with an anemic imported peach in January. 

Of course living in a northern climate places severe restrictions on what is available throughout the winter.   It can be difficult to live on meat and root vegetables for the duration of the season but there are ways to make the best of the situation.   For example, there are some excellent canned tomatoes and you can always get greenhouse and imported stuff, it just won’t be as delicious as during the summer.  Cooking methods such as braising and stewing can turn simple ingredients into mouth-watering meals.   Certainly no one is saying that you have to follow a rigorous 100-mile diet or eat only things you grow yourself!  Rice, citrus fruit, sugar, coffee, chocolate and olive oil are just some of the foods in the Canadian diet that make our culinary lives much richer.  However, I hope to encourage people to try and make the best of what we have available when it comes into season because our summers are short but the bounty is plentiful.  And, of course, delicious. 

Bon Appetit & Enjoy!